Pages

Saturday 29 December 2012

Obsessions over Lemon brioche with white truffle filling


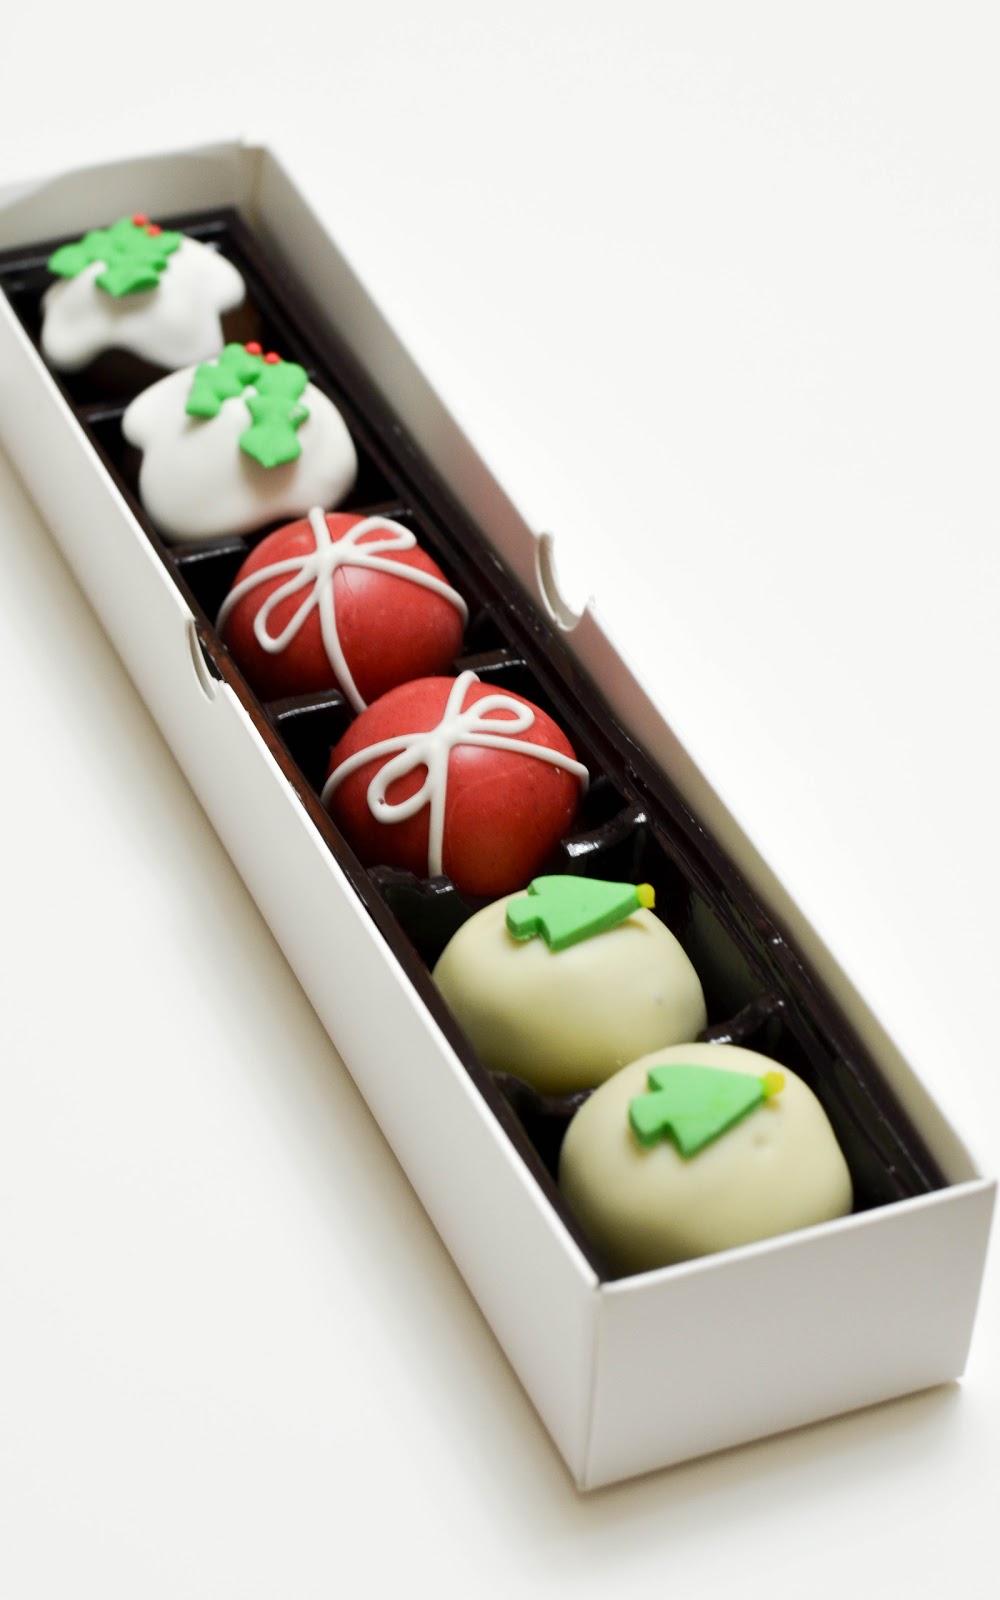
Often the term “obsession” or “obsessed” comes with negative connotations because we always imaged the stereotypes place out by Children’s tales and popular television. While some things are dangerous to be obsessed with, in everyday life I think everyone has one thing, which is constantly on their mind. The first thing they consider when making a decision and the last thing think about before going to bed.


For example, a few years ago my sister’s and I developed a wild obsession with the colour yellow. Yes, the colour yellow. Everything must be chosen in the colour yellow. Kitchen equipment, bath towels, bed sheets; you name it if it comes in the colour yellow that is the one we are going to pick. While this may seem unhealthy, it comes from a place of good will. Before this obsession, my family and I were come out from a rough few years filled with illness and bad luck. Desperate to start a new year on a clean stale, my parents enticed the help of a feng shui master.


Nothing against my parents beliefs but I do not believe in these types of systems, but it is their house; whatever floats your boat. What resulted was the massive clearing of anything remotely red, pink, or maroon from our house; and my sisters and I were forbidden to have anything thing in these colours. I had no problem with this, but to my sister’s this was a kick in the face; they loved pink.


Slowly but surely we have adapted, and now I think I have picked up this obsession too. This year I have received as gifts- an Egg yellow kitchen aid, yellow kettle, yellow toaster, yellow tea towels, yellow bed sheets and spread and a few pieces of yellow colored dining ware. Let say my kitchen gives a new meaning to the word “yellow peril.
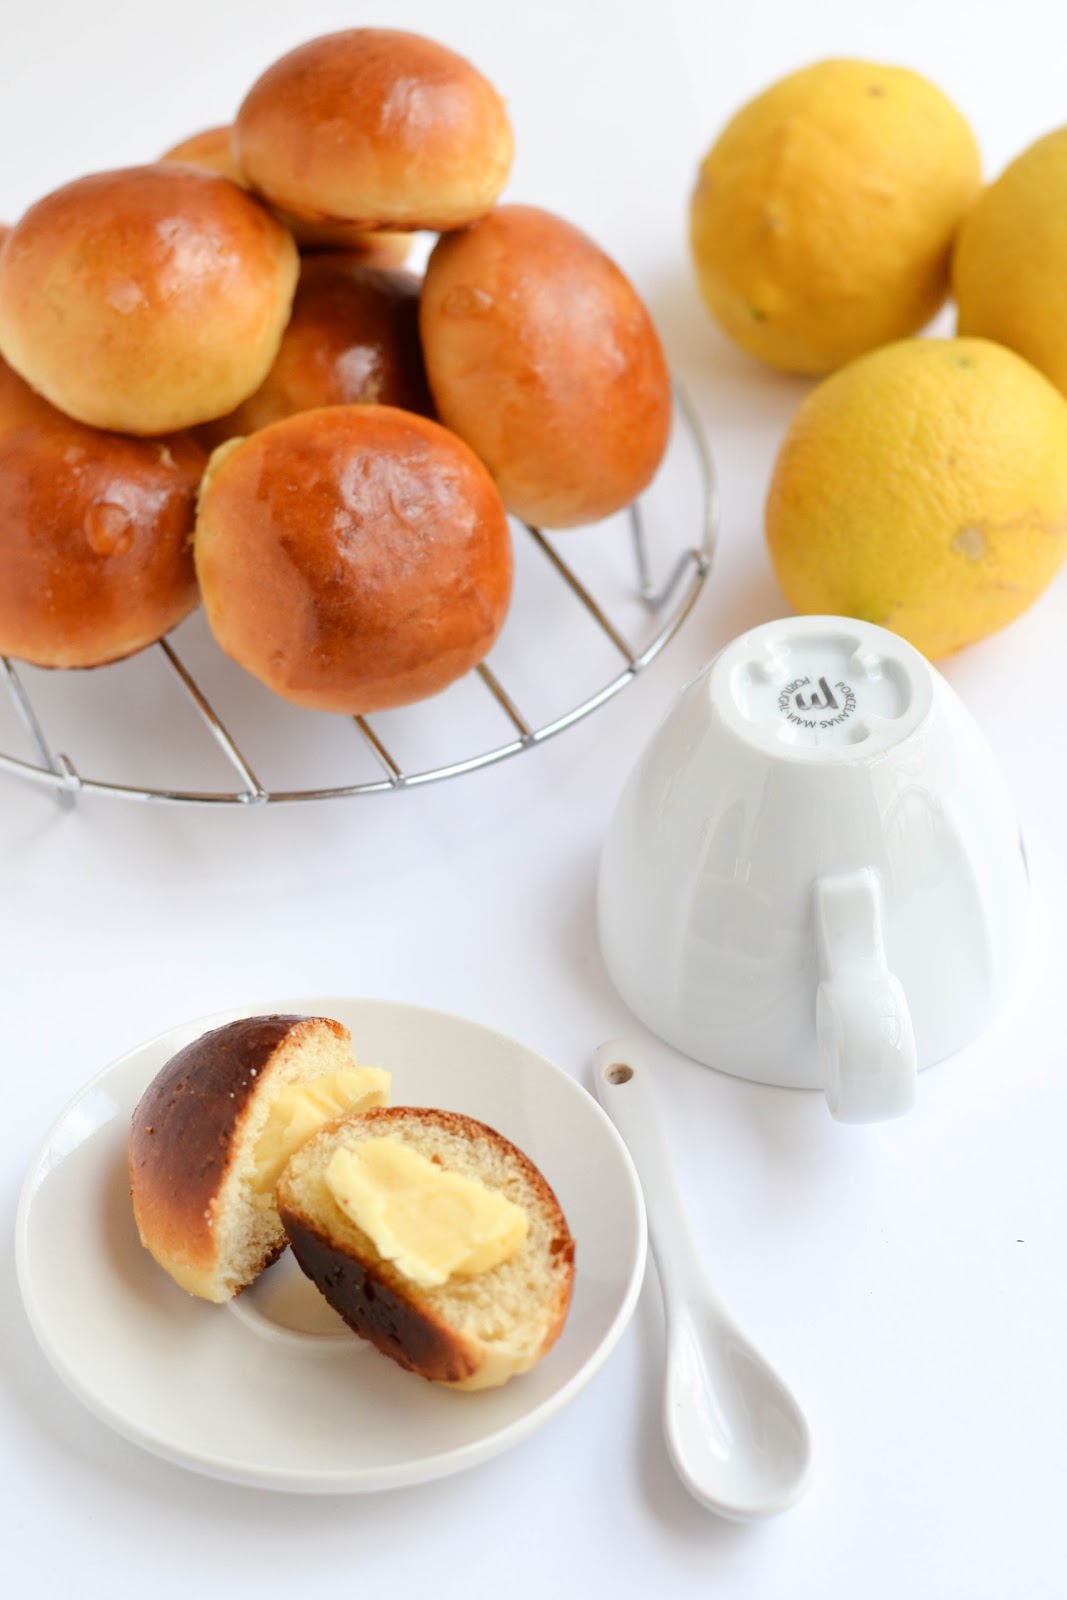
Once again inspired by yellow and having bread withdrawals (yes I have an another obsession with bread), I bring to you Lemon brioche with white truffle filling. The richness of the egginess of the bread is contrasted with the tang of lemon zest which off sets some of the sweetness ( not bad). Also this buns are made with sourdough starter, so another layer of flavor is added. The white truffe filling was just a bit of fun and just works. The dense sweetness of the filling is just enough to allow it to be eaten with a black cup of coffee or alone with an addition spread of butter (it is still Christmas).


Lemon Sourdough brochie with white truffle filling


Adapted from this recipe on The fresh loaf

Pre dough

100g AP flour

50g (approx) water

50g ripe storage starter

Mix the flour and starter, adding just enough water to make a firm white dough ball. Proof for 5 hours at room temperature or until well over doubled in volume.

Prepare white truffle filling

White truffle

250g white chocolate, chopped

60g cream

1tbsp of Creme de cacao blanc

Combine white chocolate and cream in double boiler and mix until melted.

Add the liquor and stir until smooth and slightly cool

Cover and fridge until read for use.


Final dough


350g all purpose flou

200g bread flour

50g sugar

10g salt

2 tsp lemon zest

5g instant yeast

200g firm white starter

100g warmish milk

50g butter

3 large eggs + 1 egg yolk


Mix yeast and milk together, wait 10 minutes until foamy.

Mix the yeast milk and other final dough ingredients. Turn out on a well floured surface and knead until smooth, bouncy and you are unable to leave a large imprint on the surface.

Proof for 2 hours or until doubled. Prepare two baking trays with grease proof.

Divide and shape as rounds and stuff with one teaspoon of white truffle mixture.

Place into appropriate baking tins and cover loosely.

Proof until doubled in bulk about 2 hours.

Preheat the oven to 180c.
Very carefully brush the tops with beaten egg and score lengthwise with a serrated blade.

Bake the brioche for 20 minutes (or until a poked skewer comes out clean). If the top crust gets too brown then cover with foil for the remainder of the baking time.

Allow to cool for at least half an hour.


Happy new year everyone! Hope you had a great one and be prepared with good will to start a new one.

Friday 28 December 2012

Chip Shop musing, inspiration to Pig shaped mini burger buns.


I am sure everyone has once in their life past or visited the local Fish and chip store or barque chicken cafe as a solution to hunger when you are too tired to cook anything (yes, even the people who like cooking need a break sometimes). I will admit, on the rare occasion I am in that mood, especially now my mum is visiting relatives for the holidays. Most days I am cooking for two(me and my dad), so it seems reasonable that I might want to go get some else to cook once in a while. So as a treat I passed the local Fish and chip shop, a favourite here in a Australia and noticed something.


The sign mascot at the local fish and chip store displayed a happy fish in a chef’s hat and apron flipping in a pan what looks like a smaller fish. Does that seem a bit ironic or at least unsettling that the fish is taking joy in preparing its own kind? Of course, I could be influence by the political correctness taught in society, but I am sure someone out there has noticed this with eateries such as this. Whether it is the chicken roasting a chicken or Pig frying up a burger, the premise is the same.
This is an example that inspiration can hit you anywhere, which is why this post is devoted to these mini burger buns that are shaped as pigs. A deep, golden crust encloses a firm but tender white crumb, perfect for soaking up whatever sauce you choose. We had these with left over duck and spring onions, but ham and some chutney or pickle would be great too. When sliced in half the pig looks like it is eating the meat it is stuffed with, cute and slightly unnerving burgers.


Mini Burger buns


Makes 25x 30g mini buns

Pre dough


300g bread flour

40g egg whites

20g sugar

190g Full fat milk

6g yeast

Main dough
Pre dough mixture (after rising)

30g egg white

2g yeast

5g salt

30g flour

30g butter

Mix everything together for the pre dough until till forms a firm ball. Leave to rest and double it should have lots of yeast action with lots of holes in the dough)

Combine the following ingredients but butter in a large bowl in order to form a dough.

Knead dough on floured surface until smooth and elastic.

Slowly add the butter in two additions, knead until fully absorbed. The bread should be smooth, shinny and not sticky. This took me, by hand, about 30 minutes.

Leave to rise for one hour. Prepare two baking trays.

Punch down the dough and shape into 30g balls. Reserve some bread to make ears and nose on the buns.

To make the face take to small balls of dough and pitch them into the main dough ball. Shape with your index figure and thumb, to make the small ball look like an ear.

Do the same with the nose, but round it to a nose shape and poke two holes in the small ball. Repeat. NOTE: cover buns with a damp cloth to prevent drying out.

With a small amount of egg brush the place where you will place some eyes. This can be any seed you want, I used sesame (don’t worry if some of them fall off, you can always draw them back on with edible black pen)

Pre heat oven to 180c. Bake buns in for 15-20 minutes.

Remove from tray when done and cool on a wire rack.

Next time you visit one of these places look at the signage, you never know what you will see.


Wednesday 26 December 2012

Yearly Traditions with Roasted Peking Duck.


I know this is deviates from the usual sweet baking treats from my kitchen and majority of the time this blog will be dedicated to these; I though as a special Christmas type post something savoury is order. Anyway, you roast duck in the oven, so it is appropriate in my mind.


Around this time of year, many families have festive traditions, which make it special for them. Whether it is baking a traditional fruit cake from yearlong soaked fruits to the go to recipe for glazed ham with all the timings, these little must do’s make Christmas. I like to avoid going shopping t this time of year for meats especially seafood. While I LOVE seafood, Australia seem to go ape this time of year for it and markets are filled with people queuing for the stuff. I guess you could say the seafood summer Christmas is what most Australian’s desire this time of year. Thankfully, my family tends to buy meat and store them (or forgets) about them in our deep freeze. The wonderful invention the freezer but that is another story.


Unlike them, my family never had a traditional recipe for the Christmas menu; it is make do with what we have in the house. Yes, we have duck on hand at our place, as well as multiple frozen chickens and piece of pork belly. Like I said my family buys and forgets. In some ways cleaning out our house is a Christmas tradition for us, and it is good because it save money for other Christmas traditions (boxing day and end of year sales ring a bell?)

I am paying my dues to my Chinese heritage with a Peking duck. This considered a favorite special indulgent meal at my place especially since my dad’s taste is still fully devoted to Asian cuisine. Tender duck meat roasted to perfection with the signature deep brazened skin, served with the traditional flour pancakes, Ho sin sauce and spring onions. The traditional way of serving duck is the way to go, simple but splendid.


Of course this recipe is something I made up from what I remember Peking is suppose to taste like, but I used serious eats recipe has the basis of mine.


Pek king Duck, My way.

Adapted from Serious eats


1.8kgs whole duck

Mariande

1tbsp soy sauce

1tbsp maltose

1tsp rice vinegar

2 tsp five-spice powder

1tsp salt

1/2tsp white ground pepper

After marinade rub

1 tsp salt

1 tsp sugar

1 tsp baking powder


Dry duck carefully with paper towels and place on wire rack set in foil-lined rimmed baking sheet.

Spoon marinade mixture over duck and rub over entire surface, making sure to coat all exposed skin and inner cavity.

Combine salt and baking powder in small bowl. Sprinkle evenly over all surfaces of duck.

Refrigerate duck, uncovered, at least 12 and up to 36 hours until surface is completely dry with leathery appearance.


Day of baking

Adjust rack to lowest position and preheat oven to 190c.

Bring 2 litres water to a rolling boil in a large stockpot.

Place duck on wire rack set in sink.

Pour half of boiling water over top surface of duck, making sure to cover skin evenly.

Flip duck and pour remaining boiling water over second side. Allow duck to dry 5 minutes.

Stand duck vertically by inserting wine bottle into cavity and place on wire rack set in rimmed baking sheet.

Roast, rotating after 30 minutes until skin is a deep mahogany, about 1 hour.

Reduce heat to 150c and continue roasting until fat stops dripping from cavity, about 30 minutes longer.

Carefully remove duck from wine bottle can and transfer to cutting board. Allow to rest 10 minutes before carving.


Do not mess with the duck; it is perfect as a whole. Just roast and eat.

Tuesday 25 December 2012

Because you are never too old for sprinkles: A confetti cake for my dad.


I hope you all had a great day of festive family time. While the main celebration was Christmas, it was also my dad birthday. Today was special Some may consider it unfortunate due to the pawning off of gifts as double duty presents, but he has never complained of that. Actually to think of it he has never complained about anything; in my 20 years of living, he has always dealt with everything with a tough face. I really respect my dad’s perspective on life and over the years and I have learnt to love his attitude.


My dad is probably the least choosy person in world. Everything he considers it can be clothing, food and holidays. He has always placed his families wants first. To some extent, I think he has denied himself in order to provide the life our family has. I can only imagine the hardship he has had to go through to make it as a migrant in a new country when he come he alone with little English to establish a foundation for my mum and sister’s (I was born here). Sometimes I wish he would actually have a preference about things because it makes it a lot easier on us, if we actually know what he will enjoy.


On to the cake, even though he is a grown older man, I never think anyone cannot like the rainbow appeal of a confetti cake. It is a white vanilla cake with rainbow sprinkles, with layers of cake batter cake crumb and marshmallow frosting.
Preheat the oven to 185c . Oil and line 18cm cake pans


For the cake, I used the basic white cake recipe from Whisk kid, just with 40g sprinkles added to the batter and poured in to 18cm tin for five layers.

Cake batter crunch, I was inspired by the Cornflake crunch used by the Monofuku Bar cookies and cake.
The Marshmallow frosting was posted here before; I have used it on the macaron cake. The dense vanilla scented icing is perfect match for the sprinkle sweeten cake.

Sprinkled cake batter crunch cake.
Makes one 5 layer 18cm cake


White Cake

Adapted from whisk kid

350 g castersugar

5 egg whites, room temp

2 teaspoons vanilla

426 g flour

4 tsp baking powder

½ tsp salt

355 ml milk with 1 teaspoon of vinegar, stand for 5 minutes

40g sprinkles


Sift together the flour, baking powder and salt. Set aside

Cream the sugar and butter, then add the egg whites (I cracked them all into one bowl) and add them a little at a time.

Add the vanilla and mix until fully incorporated.

Alternating between wet and dry, add the milk and flour mixture in two parts.

Fold in sprinkles

Pour into the pans and bake for 25 minutes each.

When you remove them from the oven, let them rest on the cooling rack, in the pan, for ten minutes.

Then flip, cover, and stash them in the fridge to cool quickly.

Even out layers when cooled, save these for crunch


Cake batter,cake crunch

200g left over sprinkle cake, allow to stale and crumbed.

40g egg white

50g caster sugar

40g milk powder

Preheat oven to 140c. Line a tray with grease proof paper

Combined egg white sugar and milk powder in small bowl.

In a large bowl mix cake crumb and milk paste. It should have the feel and look of pudding cake.

Place in oven and check every 5 minutes sitring to unsure even browning. Take out when golden brown.

Cool on trays, it with harden on cooling.


Marshmallow frosting,

From this post. Double the recipe posted.

Assembly

Stack the layers and frost in the following order marshmallow frosting, cake batter cake crunch, layer cake. Repeat until all are used. Fridge for 1 hour
Frost the cake as usual.


He was very happy, even the toughest of men melt to the power of sprinkle cakes.

Sunday 23 December 2012

Just one last Brandy Butterscotch snap....never.


Failures in life and in the kitchen. They happen to all of us. Yes, I have baked bread that fell upon opening the oven and burnt the life out of nuts or caramel when on the stove. To get my macarons looking as they do now came from year of practice and digging for a great recipe ( I still have long way to go to get them nice as the shops).


Around this time many of you will be arming up to slave away in the Kitchen on Christmas day, and some of you may encounter your own failures or mishaps (Of course, knock on wood that does not happen). One piece of advice I think many chefs and cooks give to others is “failure is not a failure in the kitchen, only experience”. I really believe that, because cooking is not a subject, which you can learn from pen and paper but is alive and constantly changing
But in that moment we someone just want to cry and eat a cookie, while you mop up the mess.

However, not just any cookie. Your comfort cookie.


I think everyone has a recipe, which produces their favorite type of cookie. Your go to recipe that produces comfort through the power of sugar, flour and butter. Crunchy or chewy, thick or thin, Chewy or crispy. Here in Australia, we have a biscuit called the Butternut snaps. This is my cookie all the time, every time It is a very crispy but airy biscuit with a deep caramel malt flavor While this is far from the original (out of coconut, so I subbed in crushed almond m&ms) and used a brandy caramel syrup I made the other day; These really hold up as a good cookie.


Brandy butternut snaps with Almond M&M crush.


Adapted from the Momofuku bar Corn flake cookies ( I like the freezing process for a high butter biscuit)


Makes 45 small cookies

200g butter

100g brown sugar

150g caster suagr

80g brandy caramel sauce ( or any other liquid sugar)

1 egg

1tsp vanilla extract

3g baking powder

3g baking soda

4g salt

120g crushed almond m&m

150g flour

40g ground oats


Shift flour, baking powder and baking soda in a large bowl.

Cream butter and two sugars in a large bowl until very light and creamy (8 mintures)

Add vanilla, salt, egg and caramel; beat again until it is as fluffy as before.

With a mixer on low add the flour mixture. Mix for 30 seconds. Scrape down the bowl. Mix for 30 seconds again.

Using a wooden spoon fold in oats and Almonds M&Ms.

On two large baking trays, lining with greaseproof paper and place teaspoon sized ball on to trays. Cover with cling wrap and freeze for at least one day (I find it just better the longer you leave it in the freezer).

Pre heat oven to 190c. Leave large gaps (5cm) between each dough ball. Bake for 15-18 minutes. They may seem soft but it will harden on cooling. Leave to cool on trays.


Anyway, if you make a mistake. At least the world is not going to end due to one failed recipe.

Friday 21 December 2012

Rose and vanilla macarons: the power of flavours


I think there are more flavors in macrons than flavors of ice cream. Think about it. Candy cane macarons, chilli macarons; can you believe there is one that has the flavor of hamburger. If you know what Vegemite is then yes, there is a macaron for that too


One can only think how they got the taste into the filling.

While I am not that adventurous, I am willing to try pairs of herbs or flower with familiar flavours. Rose is not a new herb in the culinary arts, but we have moved on from using it only in Turkish delight. It is not so much a flavour but the scent is very powerful. I used to hate it as a kid but like dark chocolate, it comes with maturity. Often I would see my mother brew herself a cup of tea, which consisted of many different dried flowers and a vanilla pod, producing a pleasant aroma.

This is the inspiration behind this latest macaron creation, but I really want to evoke the calming mellowing sensations of the tea. Rose tea is ground to fine power and added to the shells, while the vanilla Swiss butter cream filling has three types of vanilla added to it.


Rose scented Macaron shells
Adapted from Tartette’s basic recipe

For the shells: 
90 gr egg whites (use eggs whites that have been preferably left 3-5 days in the fridge)
30 gr granulated sugar
200 gr powdered sugar
5g dried rosebuds
105 gr almonds (slivered, blanched, sliced, whatever you like)

Prepare the macarons:In a stand mixer fitted with the whisk attachment, whip the egg whites to a foam, (think bubble bath foam) gradually add the sugar until you obtain a glossy meringue (think shaving cream).
 Do not overbeat your meringue or it will be too dry.
 Place the powdered sugar, rose buds and almonds in a food processor and give them a good pulse until the nuts are finely ground. 
Add them to the meringue, give it a quick fold to break some of the air and then fold the mass carefully until you obtain a batter that falls back on itself after counting to 10. 
Give quick strokes at first to break the mass and slow down. The whole process should not take more than 50 strokes. Test a small amount on a plate: if the tops flattens on its own you are good to go. If there is a small beak, give the batter a couple of turns.Fill a pastry bag fitted with a plain tip (Ateco #807 or #809) with the batter and pipe small rounds (1.5 inches in diameter) onto parchment paper or silicone mats lined baking sheets. Let the macarons sit out for 30 minutes to an hour to harden their shells a bit. In the meantime, preheat the oven to 280F. When ready, bake for 15 to 20 minutes, depending on their size. Let cool. If you have trouble removing the shells, pour a couple of drops of water under the parchment paper while the sheet is still a bit warm and the macarons will lift up more easily do to the moisture. 
Don't let them sit there in it too long or they will become soggy. Once baked and if you are not using them right away, store them in an airtight container out of the fridge for a couple of days or in the freezer. 

Very vanilla Butter creamAdapted from brave tart 
140g egg whites
140g Vanilla sugar
1/2tsp salt
1tsp vanilla essence
1/2 vanilla pod, scraped
1 ground dried vanilla pod (de-seeded)
458g butter

Proceed as normal with the recipe from Brave tart, but in addition add the vanilla add the addition vanilla pod, essence and ground vanilla pod. Beat until light and fluffy again.
Assembly
Sandwich one shell with a teaspoon of butter cream.

Thursday 20 December 2012

Trial and tribulations of truffle making.


You would think that making truffles are a joyful, pleasant experience. The process of making truffles should allow one to indulge in the repetitive activity to calm the senses during this time of year. Unfortunately, my first experience with truffles, did not come with calming feelings but lot of frustration because of these tiny balls of spiked chocolate.

Let’s say I will never again attempt a large quality of these babies (300+) during the University semester, at exam time. This a clear example of my poor time tracking skills; my unfailing when it comes to doing custom orders for family and friends. Though this was not a pleasant first attempt at truffles, I have learnt a hell of lot about chocolate, making them and decorating. Also, I appreciate the role of family in my life because everyone had to pull together to get these 300 done (late nights and tears were present)


First thing I advise, allow yourself time for making these. I guess that why they do them at Christmas.

Second, gather your materials and stock up big time on them. You never know what will go wrong.

Lastly, do research before you attempt making them especially advice on decorating them. It will save you lot of melted puddles of truffles and ugly balls.

The festive designs are associated with a different flavour. All liquor spiked but that is what this time of year is about anyway. Christmas is the time of indulgent treats and little (or lot) of excess, plus who can turn done cute chocolates?

The Christmas pudding is amaretto milk chocolate truffle.


The red present is a white chocolate eggnog truffle.


The white ball with a fondant decorated Christmas tree is black raspberry liquor truffle.


This small festive treat experience taught me more about cooking than any cookbook could. I just that‘s why they say experience is golden, but do not ask me to make them any time soon (once a year of crying over chocolate is enough)

Dark chocolate raspberry Liquor Truffles
Makes 40 teaspoon truffles
Adapted from basic recipe at taste.com.au.

500g 80 % dark chocolate, coarsely chopped
150ml thickened cream
3 tbs Black Raspberry liquor
400g white chocolate, Tempered


Fondant Christmas trees (made them at home)

Place the chopped chocolate and cream in a heatproof bowl over a saucepan half-filled with simmering water (make sure the bowl doesn’t touch the water).
Stir with a metal spoon until chocolate melts and the mixture is smooth. Stir in rum. Place in the fridge for 4 hours or until the mixture is firm enough to roll into balls.
Line a tray with non-stick baking paper. Roll two teaspoonfuls of chocolate mixture into a ball. Place on the prepared tray. Repeat with remaining chocolate mixture. Place in the fridge for 1 day.

Amaretto truffles

500g milk chocolate, coarsely chopped

150ml thickened cream

3 tbs Amaretto

400g white chocolate, tempered.

100g Thick writing Royal icing

Repeat the same steps for making truffles as above.


Eggnog Truffles

500g whitechocolate, coarsely chopped
150ml thickened cream
2tbs brandy
5g ground nutmeg

5g ground cinnamon 

300g candy melts

100g Thick writing Royal icing

Repeat the same steps for making truffles truffles as above.

Decorating
Christmas pudding

Line a tray with non-stick baking paper. Divide the truffles into 4 batches.
Remove 1 batch from the fridge.
Dip, holding the bamboo skewer in the melted tempered chocolate to coat.
Hold , allow for excess chocolate to drip off.
Stick into a foam box, allow to set.
Repeat, in 3 more batches, with the remaining truffles and melted chocolate.
Place the white chocolate melts in a heatproof bowl over a saucepan half-filled with simmering water (make sure the bowl doesn’t touch the water).
Stir with a metal spoon until chocolate melts and is smooth.
Spoon the melted cooled white chocolate on to the top of the truffle on the foam box. Top with holy leaf. 

Red present

Line a tray with non-stick baking paper. Divide the truffles into 4 batches.
Remove 1 batch from the fridge.
Melt red candy melts on a pot of simmering water. Stir constantly until smooth. Keep warm on a bowl of warm water.
Hold allow excess candy to drip off.
Stick into a foam box, allow to set.
Repeat, in 3 more batches, with the remaining truffles and melted chocolate.
Prepare a medium hard royal icing to the same texture as outlining sugar cookies.
In a zip lock bag spoon royal icing into bag. Sip an edge and slowly pipe a cross and two ovals to represent the bow.

White Christmas tree design

Colour white fondant green, roll out. Using a small tree cutter made from an old soft drink can(bend and shape it), press out small trees.
Top with a royal dot of yellow royal icing (dye a small amount yellow from the white you prepared earlier). Set aside
Line a tray with non-stick baking paper. Divide the truffles into 4 batches.
Remove 1 batch from the fridge.
Dip, holding the bamboo skewer in the melted tempered white chocolate to coat.
Gently tap the fork or dipper on the edge of the bowl to allow excess chocolate to drip off.
Stick into a foam box, allow to set.
Repeat, in 3 more batches, with the remaining truffles and melted chocolate.
Spread a small amount of white chocolate on the back of fondant trees and stick on the top of setting truffle.

Tuesday 18 December 2012

A macaron cake for a very special person.


This is like a second chapter to my last post and I feel this person deserves to be treated to a full blog post about them, not just a shared one.


I have received a generous offering as an early Christmas present. Not from a family member or close friend but a person I hardly have contact with. Funny how this time of year throws you a curve ball occasionally. This is a clear example of the good will people develop this time of year, and I can only hope that this continues into the New year.


They have gone out of their way to give me something out of Christmas cheer, so as something special I have made a cake just for them.


I filled it with crushed peppermint meringues; some spiked Swiss butter cream covered in white chocolate marshmallow frosting then topped it with the macarons from my last post. This is my favourite chocolate recipe and I have always used it. It produces the deepest darkest chocolate cake but still fluffy and soft.


I drew inspiration behind this from Nigella Lawson’s Grasshopper pie where she uses the combination of chocolate, liquor and marshmallows to create her pie. So I guess this is a dressed up version of it.
It is only small 18cm layered chocolate cake but do not let appearances fool you. This cake is filled with sweet flavors that work so well with each other, to produce a mouth full of minty chocolate delight.

Thank you to that person for the gift. I hope you enjoy this cake as much I did making it


Grasshopper macaron cake

1 quantity of grasshopper Swiss butter cream

1 quantity of mint meringues

1 quanitiy of dark chocolate cake

1 quanity of marshmellow frosting


Mint Meringues

4 egg whites
200g caster sugar
5g corn flour
pinch of salt
1tsp of Mint extract

1. Preheat oven to 110c.

2. Line two trays with grease proof paper.

3. Place egg whites and salt in a stand mixer and whip until soft peaks on high.

4. Reduce to medium. Add sugar a teaspoon at a time until combined.

5. After mix on medium high for another 2 minutes. It should be very shiny and thick, also from a peak on the whisk.

6. Add mint extract and corn flour beat for another minute.

7. Spoon into a piping bag with a large star or round nozzle. Pipe small meringues on the baking trays prepared earlier.

8. Bake for 2 hours until crisp and leave in oven until cool.


Chocolate cake
Makes 6 x 18cm cake layers


200g plain flour

100g white sugar

100g brown sugar

1tsp of baking powder

1tsp baking soda

2g salt

60g cocoa powder

200g unsalted butter

2 large eggs

1tsp vanilla extract

1tsp chocolate essence

200ml sour cream


1. All ingredients should be at room temperature.

2. Preheat oven to 180c. Grease and line your 18cm tins.

3. Shift flours, salt, baking powder, baking soda in a bowl. Set aside.

4. Cream butter and sugars until very fluffy about four minutes.

5. Add each egg , one at a time, beating well between each addition.

6. Add vanilla and chocolate essence

7. Add sour cream and flour mixture. Beat until just combined.

8. Pour mixture into your tins. Bake for 20-25 minutes, and using a skewer to test if ready.

9. Allow to cool in tins for ten minutes then turn out on to cooling racks.


Marshmallow frosting

230g marshmallow spread

200g unsalted butter, soften

30ml Creme de caco Blanc

300g Pure icing sugar

1. Beat butter until fluffy, should take 5 minutes.

2. Add marshmallow spread and beat until fluffy again.

3. Add liquor and icing sugar and beat for a further 4 minutes.


Cake assembly

1. Even out your chocolate cake layers into 1.5 cm high slices. Set aside

2. Take on layer and spread 1/2cup of Grashopper butter cream.

3. Meringues are added on top this layer. Place another cake on top.

4. Repeat steps 2 and 3 until you have a cake, 6 layers in height. Fridge for at least 30 mintues.

5. Take a small amount of Marshmallow frosting to form a crumb layer. Fridge for 1 hour.

6. Remain icing can be used to frost the cake. You may go for a smooth look or textured looked.

7. Place macarons on the top. Fridge for 30 minutes.

8. Serve and enjoy with a special person


Monday 17 December 2012

Salute to the season of generosity with Grasshopper macarons


I am finally able to say that I am ready to accept that Christmas is here. Like accept it and be fully able REALLY to enjoy it. I do not get into the Christmas spirit when the shops bring out the fairy lights or Christmas decorations, nor when the advisements for turkey, ham and prawns role into supermarkets catalogue. The twelve days of Christmas have turn into a three long month Christmas (Yes, that’s right Christmas decoration up in October)


Of course, I understand the economics of dragging out Christmas to increasing consumer spending and come “out of red” for retail, but I find it dilutes all meaning to what Christmas is really about.

Sure, the traditional Figures of Christmas like Santa, gifts and lot and lots of food are still all great things about this holiday. BUT what I like the most is that brings out the nicer, more generous side to people. Sort of like each person going through the story of “Christmas tale”; People who were once viewed as grumpy are very as merry etc...


I think puts all of us in a better mood, and when I am in a happier than normal mood, I like to be more daring with flavours in my baking. Not all of them turn out well, but I have recently discovered the joys of an alcoholic drink called the Grasshopper. A mixture of Crème de menthe, Crème de cacao blanc and cream, shaken then poured as a cocktail. Totally suitable for this time of year, so as a way cementing Christmas cheer, I have made Grasshopper macarons.


Quirky flavour, but will win you points with friends. I infused a white chocolate ganche butter cream with equal parts of the Crème de menthe, Crème de cacao blanc. For the macaron shell, I used Tartelettes basic recipe, works every time.

Grasshoper Macarons
Taken directly from Tartette’s eggnog macarons recipe

For the shells:
90 gr egg whites (use eggs whites that have been preferably left 3-5 days in the fridge)
25 gr granulated sugar
200 gr powdered sugar
110 gr almonds (slivered, blanched, sliced, whatever you like)

Prepare the macarons:
In a stand mixer fitted with the whisk attachment, whip the egg whites to a foam, (think bubble bath foam) gradually add the sugar until you obtain a glossy meringue (think shaving cream). Do not overbeat your meringue or it will be too dry. Place the powdered sugar and almonds in a food processor and give them a good pulse until the nuts are finely ground. Add them to the meringue, give it a quick fold to break some of the air and then fold the mass carefully until you obtain a batter that falls back on itself after counting to 10. Give quick strokes at first to break the mass and slow down. The whole process should not take more than 50 strokes. Test a small amount on a plate: if the tops flattens on its own you are good to go. If there is a small beak, give the batter a couple of turns.
Fill a pastry bag fitted with a plain tip (Ateco #807 or #809) with the batter and pipe small rounds (1.5 inches in diameter) onto parchment paper or silicone mats lined baking sheets. Let the macarons sit out for 30 minutes to an hour to harden their shells a bit. In the meantime, preheat the oven to 280F. When ready, bake for 15 to 20 minutes, depending on their size. Let cool. If you have trouble removing the shells, pour a couple of drops of water under the parchment paper while the sheet is still a bit warm and the macarons will lift up more easily do to the moisture. Don't let them sit there in it too long or they will become soggy. Once baked and if you are not using them right away, store them in an airtight container out of the fridge for a couple of days or in the freezer.


For the Grasshoper Butter cream.

My go to recipe for butter cream via Bravetart

140g egg whites

140g sugar

1/2tsp salt

20ml Crème de menthe,

20ml Crème de cacao blanc

458g butter

145g white chocolate


First melt white chocolate over a pan of simmering water, till melted.

Remove and stir in the liquors. Leave to coll down a bit.

Follow her basic recipe, then at the stage after you have added all the butter, beat in the white chocolate on slow speed for a mixer. Once all chocolate is added, turn it up high and allow it to come together again.


Assembly

Sandwich one shell with a teaspoon of butter cream.


Sunday 16 December 2012

How to fix the sick with pineapple buns (Po lo bao)


Oh how I hate feeling of being sick. Once I become ill, I turn in to the worse cry baby that surpasses any problems in the terrible toddler years. Lucky I have not gotten ill over the past year (knock on wood), but close friends and family have all been sniffing and in terrible pain over the past few months.


All the time I just want to make them better again, so they can return to their normal selves but sometimes I know there is only so much I can do help them. One of the ways of making people feel better is to bake them food from their homeland. So over the past months I have been making steamed custards, sweetened condense milk egg tofu and red bean desserts to remind my Asian parents of the comforting sweets from their childhood. Of course, I cannot recreate the recipe exactly or make it taste like their mother’s cooking, but I willing to give it shot.


This classic Chinese bakery staple, Po lo bao or more commonly referred to a pineapple bun. A fluffy cake like round breads surrounded by a sweeten cookie dough brush with egg yolk to give them a golden finish. I have recently made theses buns, after I once attempted them in my very, very early days of baking ( and yes this is before I realized people blogged about food).

I have adapted to my taste and method like sweetness and richness of the cookie, but like all cooking, it is a matter of taste.

Pineapple Buns
Adapted from Christine’s recipes, blog post from Pig Pig’s corner
Makes approx 20-25 buns. About 40 g each.


Bread recipe


400g Bread flour


50g caster sugar


6g salt


9g dry yeast


40g skim milk powder


150g milk


180g water


30ml rice bran oil


1 large egg (59g)


Cookie Topping


100g butter


80g powder sugar


1 teaspoon of vanilla


¼ teaspoon of baking powder


¼ teaspoon Bicarb Soda


2 egg yolks


150g plain flour


60g cornflour


1g salt


Plus one egg for coating.


1. Place yeast in warmed milk and 20g sugar for 30 minutes. Make it nice and bubbly.


2. Add flour, remaining sugar, milk powder, salt, water in this yeast mixture. Mix roughly.


3. Add egg and oil and kneed for 20 minutes. I do this by hand, so with a mixture it might be shorter. Please note this is a wetter dough, but floured lightly hands will do the trick.


4. Rest for 10 minutes. Kneed again for 10 -20 minutes until it is glossy and has passed the window test (test for fully developed gluten in dough).


5. Let rise for 1.5 hours or doubled in size. Cover with plastic or a damp towel


6. During this time prepare cookie topping.


7. Line two baking sheets with grease proof paper.


8. Preheat oven to 200c.


9. When doubled, Press down and divide into small 40g balls. Cover for 45 minutes.


Cookie dough

1. Cream butter and icing sugar till very fluffy.

2. Add egg yolks one at a time, beating after each addition.

3. Add vanilla and salt.

4. Mix in flour and corn flour till it is combined and forms a dough.

5. Roll into a log, wrap in Cling wrap and fridge until use.


Baking and assembly

1. Take out cookie dough from fridge and slice log into 20g slices.

2. Between two pieces of cling wrap, roll out slice into a rough 3mm thick circle.

3. When breads are fully risen, place each rolled out cookie disc onto a bun.

4. Brush with egg wash.

5. Place in oven. Turn down to 180c and bake for 15 -20 minutes.


Bread heals all. No question about it.

Friday 14 December 2012

Melting moments, paying respect to a great fruit.


Who remembers the great banana famine of 2011?
For those who are unaware, Cyclone Yasi hit Queensland wiping out a majority of banana production for the country. This shock in the banana production sent prices of bananas into the $15 per kilo mark, almost on par with fresh berries and exotic fruit. Who could ever image the common banana could sell for more than a bunch of out of season grapes?
The ritual of baking a comforting loaf of banana bread became a treasured luxury, and banana where treasured as a bar of gold in the fruit market. I think I remember an article where new line of “banana bandits” where steal bananas from small shops. Let say the country when a bit crazy for a while.


Now in 2012, prices are back down again and the aroma of banana bread has return to the Australian House hold. Normalcy has been restored.

To pay homage to the common banana, I decide to take another classic biscuit and give it a twist with some coconut melting moments with banana Swiss butter cream. This is nice variation to the classic but my heart will always be with the velvety vanilla kind.


Coconut melting moments with Swiss Banana Butter cream.
Makes 30 smallish filled cookies with extra icing.
Adapted from Cookies by Woman’s Weekly


Cookies


250g butter, soft unsalted


1tsp coconut essence


1/2tsp vanilla extract


90g icing sugar


60g custard powder


125g plain flour


90g Corn flour


Optional: Icing sugar for dusting


1. Preheat oven to 160c, non fan forced. Line two baking trays with grease proof paper.


2. Cream butter and sugar till very fluffy (4 minutes), add extracts and beat till combined.


3. Slowly mix in custard powder, flour and cornflour until fully combined.


4. With floured hands, roll teaspoon of cookie mixture into a ball and flatten lightly with a fork. Place at least 5cm away from each other on the trays.


5. Bake for 13-15minutes. Do not allow them to colour too much. Stand on trays till cool.

Swiss banana butter cream

500g Plain Vanilla Swiss butter cream (I used Brave tart. recipe, it is perfect)
2 small very ripe bananas (Approx 150g)
100g icing sugar


1. Prepare one batch of the plain butter cream.

2. Mash bananas very well.

3. Add bananas and sugar to the cream. Use a mixer with the creaming attachment.

4. At this stage it may look like it is curding, but continue to beat and it will come together again.


Assembly
Sandwich the cookie with 1-2 teaspoon of cream. I pipped mine but it will be fine to do it by hand.