Pages

Monday 29 April 2013

Officially 21 /-/ Fat kid birthday cupcakes for a Fat kid party.


I am going to put this as simple as possible.


I AM 21 YEARS OLD! Yep, yesterday on the 27th of April 2013, I, Belinda (aka. Owner of the moon blush title) have been on this planet for 21 years!


Great now I feel old. Not supper old but old enough.


I often use the excuse that Oh I am twenty I still not an adult (legally yet) everywhere in the world; I can still party my way through life. Now however, I cannot longer procrastinate about the future, I am an adult which means time to find a direction. *tear* Anyway I bake myself a few desserts this year in memory if the first birthday party I ever had. I had a big cake too, but I still need to prefect the recipe for it(it was awesome and I want it to be perfect, because after you guys need to make it). The theme? BOOZY FAT KID PARTY.


This title is relates to me more than you could ever imagine. When I was younger, yes I was a chubby bubble. Fortunately My metabolism has kicked in (thank you genetics) and It runs faster than fat kid to cake. Anyway this cake also come from someone that has massive influence(she is one who inspired me to cook again after a long break) Nigella Lawson. I ADORE Nigella and I mean point to obsessive adore. She is the fairy god mother we all want to cook us a big hunk of cake and give us a big hug on a bad day. She simplistic take on cooking accompanied by a great command of English language has made me fall in love with baking and savoury cooking. Also I think she will approve of me giving my cupcakes a cute name, like many of her recipes.


Let me get deep over cake with you. I do not know if you can remember the first time as a child you had a birthday party. Like the one where all your friends from school (and the ones that HAD to be there because they were in your class), you handed out invites, played games, ate candy and best of all you had a crows surround you to cut cake and sing to you. This is of honour of the first time I had a birthday party. At my first birthday party when I was 6, I had a simple plain vanilla cake that was filled with coffee crème (yes I started early) and I had my childhood favourite bread donuts as a side dish.


Inspired and greedy I fused the two. I know everyone has done this before, but it is my birthday cake and I do want I want.


I really do not know why I bother cooking myself cake when my family often insist I take a break from baking. Maybe it is because I still become excited when I crack open a fresh bag of flour, whip up some custard or pull a baked sponge out of the oven. I will never get sick of it, the little rush has returned and I think it is going to be with me for long time.


This cake is from Nigella Feast cook book. The moment I laid eyes on it, “birthday” had the word I focused on the most. A simple retro sponge made with the old fashion custard powder, filled with custard and covered in a chocolate glaze. Of course now the custard is going to be spiked with Tia maria and there has got to be chocolate somewhere.

Do not forget the sprinkles we all need sprinkles.


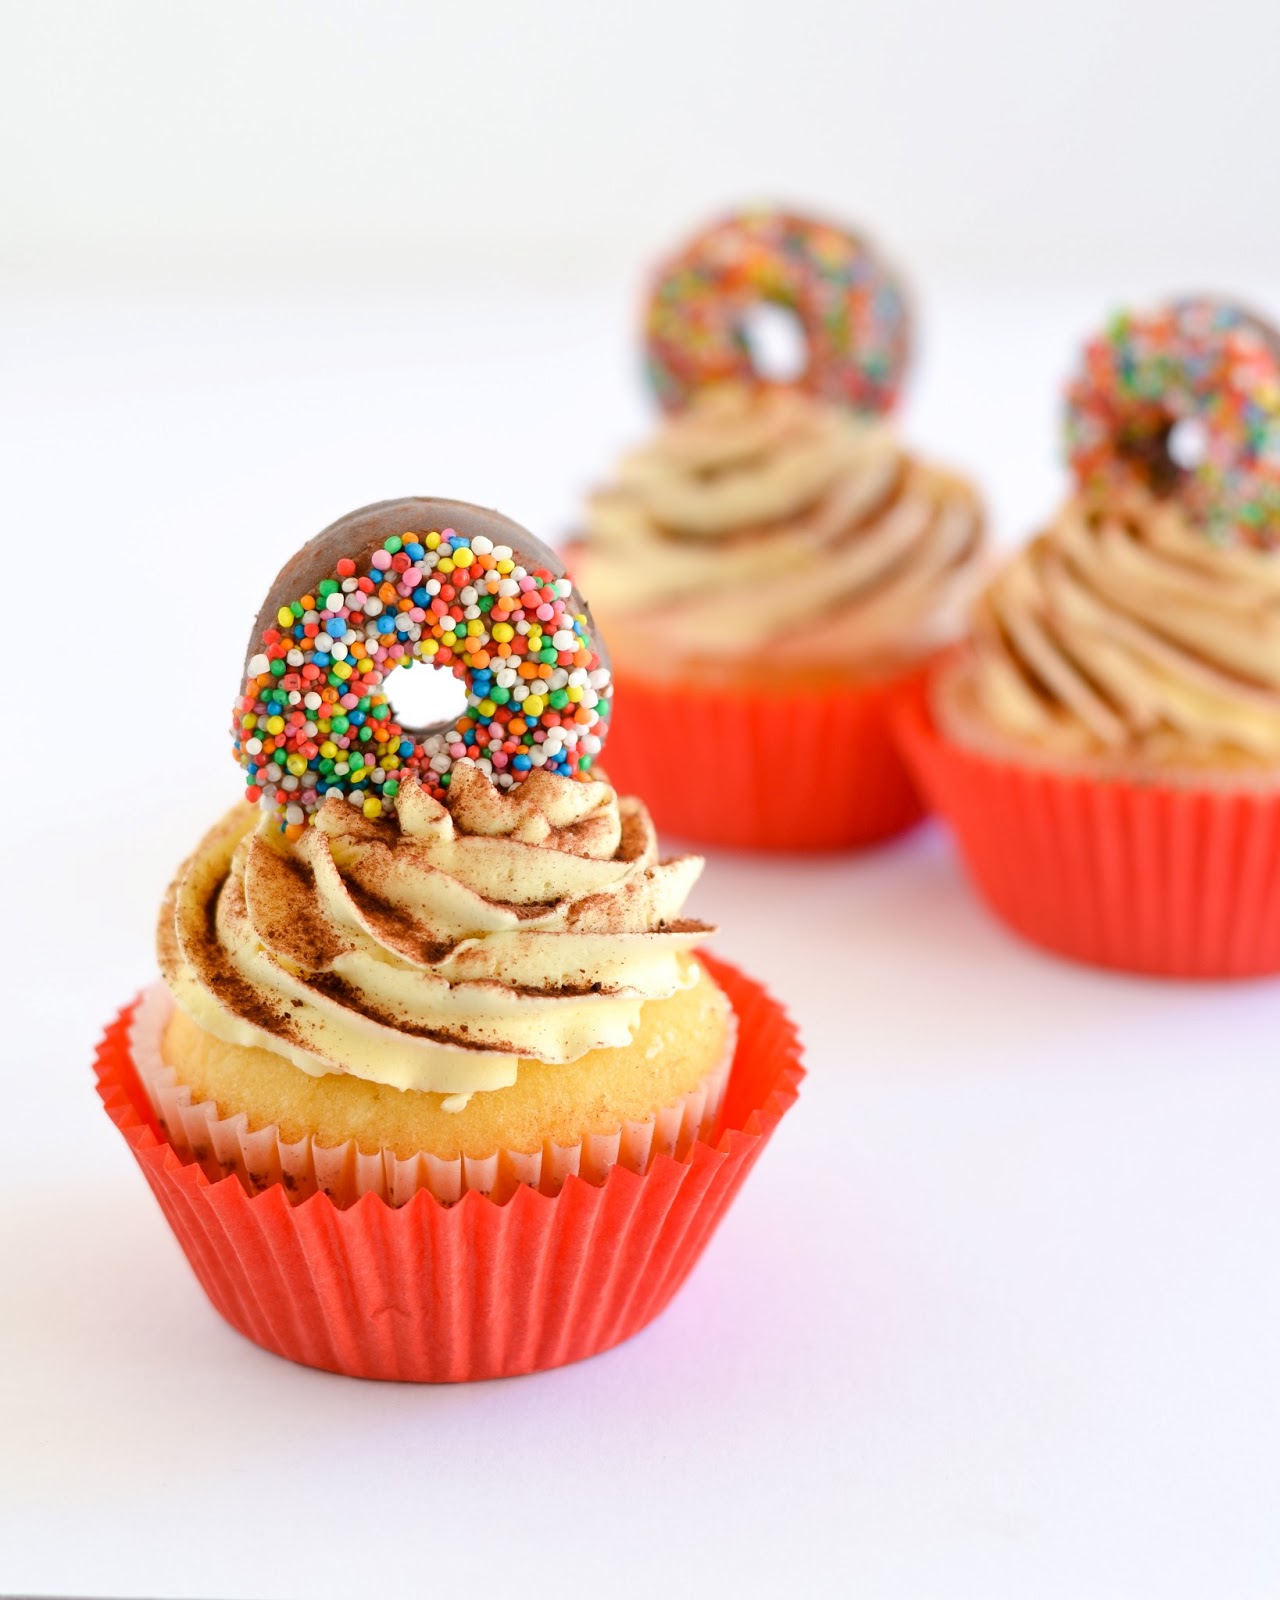
A cupcake version of my first childhood birthday cake. I never felt so young and old at the same time.


Fat kid cupcakes with boozy coffee creme


Taken directly from Nigella Feast Best birthday cake

Makes 24 cupcakes


200 grams plain flour

3 tablespoons custard powder

2 teaspoons baking powder


½ teaspoon bicarbonate of soda


4 large eggs


225 grams soft butter


200 grams caster sugar


2 - 3 tablespoons milk


Preheat oven to 180c. Line two trays of cupcake tins with liners of choice.

In a food processor, place all the ingredient but the milk and blend. The amount of milk to then drizzle in should result in smooth softly set batter ( it should look like custard).

Spoon into cupcake cakes and cake for 20 minutes or until tooth pick come clean.


Allow cooling for 10 minutes then move to wire cooling rack.


Whipped cream

500ml thicken cream

100g icing sugar

1tsp vanilla extract


Combine all ingredients in a bowl and whip till stiff peaks.


Coffee custard

500ml of milk

3 egg yolks

100g sugar

60ml Tia maria

2tsp instant STRONG coffee.

30g Dutch cocoa

90g cornflour

50g butter


In sauce pan, bring the milk to almost boiling.

In large bowl, whisk your egg yolks, sugar, coffee powder and Tia maria until it is very fluffy.

Fold in your corn flour.

While whisking, slowly pour in heated milk. Return to heat in another pan.

While stirring constantly, heat until it is thicken and coats the back of the spoon. Add butter.

Leave to cool by placing a piece of cling film on the top. Place in fridge for 1 hour.


Donut cookies

I used a simple short bread recipe for these; I made no changes to this one on Joy of baking. SO all the credit goes to that website. Honestly use your favourite short bread recipe and replace some of the vanilla with a Caramel extract and add 10g of cinnamon to the batter. This makes it taste like donut holes you get at the shops.

For the chocolate coating temper 500g of milk chocolate and dip your cookies into the mixture. Transfer to wire rack to dry. Before it sets sprinkle with sprinkles.

Assembly.

One lot of cupcakes

One lot of custard

One lot of mini chocolate coated donut cookies

Whipped cream

Cocoa powder.


For each cupcake, make a hole in the middle. 

Place a Teaspoon of custard in the middle.

Top with whipped cream and place a cookie in the middle.

Finish with the cocoa powder.

Friday 26 April 2013

Selective everything/-/ Maple pecan cupcakes with tiny buttermilk pancakes.


Do you follow recipes in the kitchen? Are you one of those high tech savvy people, who are able to follow the recipe ipad app at the same time as cooking it? Or do you struggle to even read a recipe without putting in your own selective thoughts and missing one or two things?


I know when I read recipes I have to read them at least three times. Yes three. One time for the ingredients, one time for the recipe and one time for the recipe again; but this time without my brain assuming the steps. You have heard of selective hearing right? Well I think I have selective senses, I have always missed things that other can catch on the first go.


Maybe it is just my impatience and that I often day dream but it does mean I have to ask people to repeat things. This is particularly annoying when I am following recipes for cakes and cupcakes. I am anal about the amounts; they have to be on the dot. This means using a scale but for a lot of recipes people use cups and liquid measure cups. I tell you if I had a dollar for number of times I have done this wrong. It also does not help that the best recipes need to be converted to US metrics to Australian metrics. Oh the perils of living in Australia.


I think cupcakes are especially important to follow the recipe to the mark because with such small delicate cakes, ANYTHING can make it go wrong. The too hot oven, under or over whipped creaming of sugar and butter, too much or not enough flour; the list is endless. Thankfully when I was developing this one I was using the baker’s ratio in order to get the amounts as close to right as possible. Also I found you cannot just replace syrup for sugar in a damn cake ( many, many fails attempts to learn this). I never thought about counting that syrup is liquid rather than solid…. Yep selective senses strike again.


For a dessert/sweet blog, I have yet to post a cupcake recipe. Well long time coming but I am no longer a cupcake less dessert blog now! This cupcake is inspired by the most important meal of the day breakfast!

There is place here in Sydney which is infamous for their pancake selection. I think what makes them special is the fact they are not the thin, English style pancakes but the big, fluffy thick ones you see the USA. I have never been a fan of pancakes until I went there and tired theirs. Maybe because growing up I had pancakes out of the shaker bottle and assumed all pancakes were like that. The bottle ones are especially nasty when you do not shake it well, egh…


Wonderfully fragranced cupcakes with a fluffy interior and topped off with a pecan flavour butter cream. The smokiness of the pecan extract is the highlight of this cupcake for me but then again I have always had a weakness for nuts. This buttermilk pancake recipe is a scaled down version of those big thick ones. I love butter milk in pancakes, not only because their slightly sour tang but it lets the bicarbonate of soda work its magic over time! This means very fluffy pancakes because the bicarb is still active. Look a cupcake you can eat for breakfast! No need to feel guilty(FYI, you should NEVER feel guilty about eating anything even chocolate for breakfast).


I know this a bit of self ingulent post but Would you mind checking out this page for the GOOD TASTE Cutest cupcake competition? I have entered this one in to the running and would love for one or two of you to vote for me. It is under “pancake maple cupcake”. Thank you if you take time for your busy lives to help me in my pursuit of cute cupcake cuteness.


Maple cupcakes with Pecan butter cream and butter milk pancakes.


Make 12

195g plain flour

140g raw caster sugar (normal white is fine too)

6g baking powder

4g bi carb

125g butter

3 egg yolks

1 tsp almond extract

90ml milk

100ml pure maple syrup


Preheat oven to 185c. Line your cupcake tin with 12 wrappers

In large bowl cream your butter and sugar for 5 minutes. It should be light yellow, fluffy and sugar grain free.

On medium speed, add your egg yolks one at a time beating well in between each addition.

Add your extract. Beat well once again.

In jug mix your maple syrup and milk. Shift your plain flour, bicarb, and baking powder in a another bowl.

Fold 1/3 of the flour mix to butter. After fold 1/3 of the milk into the batter. Repeat the folding process until all mixes are folded together.

Scoop your batter into the cupcake cases.

Bake for 20-25 minutes until a wooden tooth pick comes out clean.

Leave to cool in the tin for 5 minutes then transfer to wire rack to cool.


Pecan butter cream

Barely adapted From the Taste.com website


150g butter, soften

500g icing sugar

2tsp pecan extract

50ml buttermilk


Cream you butter in large bowl till very fluffy and almost white. Add your extract.

On a slow speed beat one half of the sugar in to the butter. Add your butter milk. Beat again.

Add the last bit of sugar and beat until fluffy and all ingredients are combined.


Buttermilk pancakes


100g plain flour

150g self rising flour

2g bicarb soda

4g baking powder

2g salt

30g sugar

2 eggs

150ml butter milk

30ml rice bran oil.


In large bowl shift you flour, salt, bicarb and baking powder.

In jug whisk the eggs, butter milk, oil and sugar.

Pour your we mix into the dry mix and fold until just combined.

Heat a fry pan on medium. Add your choice of oil or butter. Then wipe around to get rid of excess.

Using teaspoons drop batter into the pan and cook for 1-2 minutes on each side. You know when to turn when it shows bubbles on the surface. Repeat until batter is finished.


Assembly.

Take one cupcake and pipe your butter cream to form a base.

Next stick together three pancakes with extra butter cream and place on to of this base.

Before serving add a piece of yellow chew candy to look like butter and drizzle with more maple syrup.

Linking to the group on Whats cooking wednesday for Bunsinmyoven

Tuesday 23 April 2013

Comedic remedies/-/- Grass hopper pie


The Internet is wonderful place to find comic relief. Being able to break the connection between work and home time I think keeps the sane, sane. Laughing is truly is multidimensional tool for happiness and did you know that laughing also reduces stress? Often needed in times of uncertainty and pressure.


What do you do to make yourself laugh? or How do you ease the pressure of work, life social balance? For some it comes in the form of trolling the Internet for cat memes or watching an episode of big bang theory. Those things are great but I have few things that makes me instantly happy.


I am going to tell you truth about what makes me laugh as immature, cruel and childish as it sounds. I like to look up picture of tattoo failures, especially one that have to do with quote or Chinese symbols. I do not know why there is an obsession among people to get quote written in a different language, maybe you are consider cultured and “deep”. Anyway I find it impossible not to giggle find picture or meme’s or tattoo failure on the net. Come on you have laugh at least once that some guy thinking a tattoo means bravery, courage, strength is really “steam pork bun” or when some misspells a quote. The moral of story here kids is triple check you tattoo choice at least someone with a good knowledge of the language before you mark.


Also another linguistic fail I find it amusing is when people sing the lyrics to song with such passion but the words are wrong. I know I have wrongly interpreted song lyrics; when I first heard PSY new song I though he was singing about Gonorrhoea in one line. My major epic fail, thankful I cannot sing so no embarrassment lost there.


Finally I love to watch Finding Nemo. This movie is probably the best pixie film ever ( sorry toy story, I am breaking up with you). There is particular scene where Dory is speaking whale; I cannot remember the number of times this has made me split down the sides. It just embodies the interconnectivity of species and support post humanists theory… sorry social science talk coming through. In short Ellen is awesome, fish are awesome and being almost 21 and still watching cartoons awesome.


I have been longing to make this type of pie for a while; not because of the cocktail but I was drawn to the filling which promised a mouse like texture with half the work. This is dessert is embedded into Southern American food culture; I am not sure when it was first invented but given the name and colour I assuming around the 60’s or 50’s. I love mint and chocolate together in cold desserts, the coolness of the mint leaves your mouth tingling for more. After you get the sweetness of bitter sweet chocolate to finish which leave you refreshed, light and satisfied. For the base I used a mix of dark chocolate Tim tams, normal Tim tams and dark chocolate in order to form a base which is more than just a crust. This pie is so easy , quick and uses the stuff you most likely have in pantry(beside the alcohol I guess).


Grass hopper pie

Adapted from FEAST; food that celebrates life by Nigella Lawson

Makes 3 15 cm tarts


130g Original Tim tams

130g Dark chocolate Tim tams

60g dark chocolate (min 70%)

50g unsalted butter, melted


For the pie

150g mini white marshmallows

115ml milk

40ml Crème de methe

40ml Creme de blanc

150ml cream

Green food colouring


In a food processor, crush the biscuits and chocolate together until thoroughly broken. Add the butter and process until you get cookie dough which clumps like sand.

Push into your tart tins with a metal spoon and transfer to the fridge for one hour.

In medium sauce pan combine your milk and mini Marshmallows. Stir on gentle heat unit they are melted together. Whisk in your alcohols in to this mix.add you level of green food colour I used paste, so a few drops will do.

Beat your cream to soft peaks. Fold in the green mix to the cream. Pour in to your prepared tart tins, smooth it out and place in fridge for 3 hours.

To decorate crumbled left over Tim tams and top with chocolate covered marshmallow bites


Note: You can make this ready for 3 days. Once firm cover with cling firm to prevent the filling from dying.

Saturday 20 April 2013

Girl verses Kitchen /-/ Beer glazed basil focaccia


Let me ask you a question. How often do you get minor injuries in the kitchen? Once a month maybe; from an accidental slip of the hand when chopping or a careless grab at a boiling hot handle from the oven. Maybe even twice a month during the festive season.

I admit I am clumsy person in life but I am a major danger to myself when I get into the kitchen. Every time I have used the stove, oven or any kitchen appliance, I seem to come worse off than when I started.


For the past few weeks I have realised that all the boos-boos and scars I have all come from my adventures in the kitchen. Every time I cook something, there always has to be a safe aid kit somewhere just in case. If there was a television show documenting my kitchen activities it should be called Girl verses kitchen appliances. Think I am exaggerating? Maybe a bit but I am definitely getting a new scar every week for baking.


For example, this past year I have acquired a number of new burns on my arms and hands. I think this past week I have burned myself 3 times on the stove. Often it is because I am quite short;  every time I need to reach for something on the back to stove tops, my arms grows ever closer to being burned hot fry pans.


It is not just the big appliances that have it out for me, I think my toaster does not like as well. Have you ever been shot at by your toaster? Not just once but 2 twice.

You know how they say a watched kettle never boils, it does not apply to toasters. The only two times I have stood by the toaster, I have been shot at by flying pieces of burning hot toast. I wonder if they have taken battle tips from Greek history?


Hopeful your toaster will not attack you when you need to toast a piece of this focaccia. I know I have posted two bread recipes before this one but unfortunately I have been very stressed. Others go to desserts, my stress relief is bread making and eating. I have been experimenting with beer based baked goods because I have been inspired by a fellow blogger who is known for her beer recipes. She does such creative things and many of them look delicious. While I may not be as creative as her with beer, I saw this recipe for a beer glazed focaccia and I just had to try it.


This is a wonderful aromatic bread because the caramelised beer glaze; along with the olive oil it provides a crust which contrast against the chewy tight crumb. For the herbs you can use whatever you fancy but I have been looking for an excuse to use my bottles of infused olive oils (lemon chili in this case) and paired it with Thai basil. To compliment these Asian flavours I used Tiger beer here, I find that you need stronger beers against robust flavours. Toasted or eaten the day it is made is the best way to serve with bread but it also freezes very well and makes great croutons.


Beer glazed Thai basil Focaccia

Adapted from this beer glazed bread and the Focaccia recipe from thekitchn.com

One Focaccia about 27x19cm


300g bread flour

5g yeast

175ml warm water

5g salt

60g Chili lemon infused Extra virgin Olive oil

120ml normal olive oil

1 bunch of Thai basil, chopped

1 medium chili, the large ones which are not as hot, scrapped and chopped

2 tsp cracked pink salt

1 tsp cracked pepper

150ml beer


Combine your yeast and water in a jug, Stir to dissolve and leave for 20 minutes to get foamy.

In a large bowl combine your flour, salt, yeast mix and flavoured oil. Knead until you get a smooth ball but still slightly tacky. Coat with oil and place in clean bowl.

Cover bowl with cling film and leave to rest and proof 1-2 hours.

Pre heat oven to 250c and place your pizza stone in the oven. Line a flat baking tray with grease proof paper, oil generously with unflavoured oil.

Prepare your beer glaze. In a frying pan, fry off your basil and chili in 30ml of olive oil. Add your beer and leave to reduce until most of liquid is gone.

Punch down dough and place in your dough in prepared tin, stench it out as much as possible. Cover with a damp towel and leave to rest for 30 minutes.

With your hands spread the beer glaze then poke dents in your bread, pushing the herbs into the dents. Coat with remaining olive oil and sprinkle your salt and pepper.

Place in oven and turn it down to 190c. Bake for 20 minutes. It may come out darker because of the glaze.

Remove from pan straight away to cooling rack. Leave for 10 minutes.


Wednesday 17 April 2013

Penny pinches/-/Whole wheat sourdough pita


I like saving money as much as the next person. Believe me any time when I see a two for one or half price sale; you can guarantee I will be all over it. Discounts and mark downs are always on my radar when I go shopping; I learnt from the best you know (aka my parents). There is just this one thing I can not get off my mind and that is this obsession with feeding your family for under a certain amount of dollars. Now I know it is just a promotional stunt but I cannot help feel we are being told a bit of lie here. With the Great GFC leaving many of us worried about money, I understand the rise in popularity of cost per serve labels.


If you live in Australia, a major supermarket is promoting this as their main selling point to shop at their store. Through the use of magazines and popular celebrity chef apparently (I use the word lightly), you are can feed a group of four for under the price of good book. On paper it sounds passable just like those quick meal things which take forever to get right. I have more trouble cooking something from the packet than making it myself. Maybe I fail at following instructions. In reality, they take more from you than give.


First all I do not think adding up the price per gram of ingredient used in recipe is right. You have to buy the whole thing when you are in supermarket, no one is going to only let you buy two tablespoon of tomato paste or 200ml of cream. This leads to another question. What do you do with the left over 50 ml or rest of bottle?


Once again if you do not cook often or know how to use it, it will go to waste. Some of the ingredients they have used only have short shelf life too, so more again more waste.

Another thing does it seem like they are using a lot of ingredients for an
“Easy” recipe? I may use many different things and apply a lot of techniques in my formal baking, when I am cooking dinner my recipes are only 5 ingredients MAX long. Yes I have a stew that is made by only using 5 things.

The thing I am most concerned about is the serving size is never enough. It might be ok for 3 girls or 4 small children but I know males are going to want to eat dinner too. Any one that has teenage boys or even a boyfriend would know this; one serve is never enough. Also who has ever disliked left overs? I love them.


Anyway to this pita. I have never made these before as I rarely eaten them outside the restaurant. Store packaged ones are just nasty…; dry and brittle pieces of leather in my opinion. I never thought they were so easy. Inspired by a number of bloggers, I undertook my first pita a few week before. Results? An extremely happy baker. Since then I have made these every week; easy wraps and instant pizza bases. Everything a girl needs to make an instant lunch.


This time I changed it up and looked up a recipe for sourdough pita. I have been neglecting my pet for the past few weeks, so it definitely needed a good feeding. I used this one form a website I love. Joes pastry has always served me well and this time is no exception. While pita has a distinct chewiness about it compared to the ones made with dry yeast. Also I used half whole wheat here which definitely effects the texture. So if you need to refresh your sour dough pet make a batch of pita. You will not be disappointed.


“sour dough” Pita bread

From Joe pastry.


300g bread flour

280g whole wheat plain flour

280g bread starter (your sourdough starter)

8g salt

7g yeast (dry)

15g sugar

30ml rice bran oil

170 ml warm water


In a stand mixer, place all gradient in the bowl. With the dough hook, mix the ingredients on low for 2 minutes.

After move the speed to medium and knead for a further 7 minutes. It should become smooth, silky dough. This one is slightly wetter but it is ok if you flour your bench more when rolling.

Leave to double for 1 hour.

Pre heat oven to 250c and place your cast iron pan in the oven(I used the wide French casserole dish)

Divide your sough in to 70g balls. Roll into a ball and let rest for 30 minutes. Roll out to circle and leave to rest for 10 minutes.

When they are slightly puffed, drop two pitas in to the pan. Bake for 3 minutes then turn. Bake for further 3 minutes and remove to plate. Repeat.

Stuff them now or freeze for later.

Sharing this in link up for Buns in my Oven


Monday 15 April 2013

Forgotten treasures/-/ Caramelised onion and poppy seeds Bialys


My mood is flat right now. I do not know whether it is combination of university deadlines and a lack of sunlight that is placing me in the dumps. Could it be the musings in my social science topics that make me realises how much the world is controlled and dictated by powers we cannot influence. Whatever it is, it is putting me a reflective “ponder the meaning of life” mood. So Right now I will give you my latest musing on life.


In the hectic rat race of life we often overlook some of the best things in life; forgetting the treasures of the past. We have all rushed out the door to buy into the newest fad whether it is a new diet or health craze. We stock pipe and display massive amounts of generic retail products while we keep our antiques and prized items lock away behind closed doors. I wonder if we actually stopped and looked, could the increasing want for the newest and latest be destroying our sense of satisfaction?


Sure there standards are lower than ours (hell, a few decades ago if you got one TV per family you were considered lucky) but they seem to not care about things as much e.g. the 60’s era. For me I often forget recipes that I really loved, book marked and everything but never have the chance to cook. I keep on stoke piling more and more recipes in greed, hoping to cook the one day. Trivial I know but cooking and baking food I am inspired by makes me happy. Bread is a special thing that always warms my heart every time I bake it. Sign, The power of flour and yeast.


My cook book collection is a stock pile of food throughout the decades and nations. They originally were my mother’s recipes and cook books which she got from her cooking days back in Hong Kong. Did I ever mention that my mother used to cook the best Chinese steamed cakes and breads when I was young? One day I share you guys her recipe for the best steam sponge cake. She has not made this for many years which bring back to my point of the forgotten treasure of the past. Something as simple as a recipe can inspire a young girl to follow in her mother’s cooking footsteps.


The most inspiring recipes, I find are one which have a deep rooted history. I have a special weak spot for the Jewish breads and food which have such meaning attached to them. We all know about bagels and matzo but have you heard of Bialys? I found this recipe in an old scrap book my mother kept, I have no idea where it is from since it was hand written on a small piece of paper but it was so mysterious to me I had to try it. Researching this bread, it has deep connections with the genocide of the Jews and repression of a culture. The bread is like a bagel but has a filling well which is stuffed with onions and poppy seeds. This is not boiled but it is over kneaded in order to create a small crumb which contributes to the chewy texture. The best part for me about this recipe is that it has survived over decades even with the odds stack against them. I might not be Jewish or have tasted a real ones of these, I hope to one day after this experience.


Chewy, flavourful rolls with a sweet onion filling and satisfying crunch by the poppy seeds. This is great but you don’t need me to tell you that. Make some for yourself! Well worth bread kneading effort.

Bialys with Caramelised Onion and poppy seed

Makes 17 mini ones

Adapted from the recipe tear out and this recipe from Brooklyn Bialy


5g yeast

10g sugar

400g Bread flour

270ml warm water

8g salt

15g olive oil

2 white onions

10g salt

20g poppy seeds plus extra for toppping

1 egg white for wash


Prepare you onion filling


Dice your onions.

In a large fry pan, place 15g olive oil and allow to heat up on a medium heat. Place your onion and salt in the fry pan.

Cook onion, stiring once in a while until it is deep golden brown. Once cooked and caramelised, add your poppy seeds. Allow to cool


Prepare your bread


In a large jug place yeast, sugar and warm water. Allow yeast to become foamy about 20 minutes.

In a large bowl place your flour and salt. Mix to combine. Add the yeast mixture.

Knead the dough until it smooth and elastic. About 30 minutes if done by hand. Cover with a damp cloth in an oiled bowl and set aside to rise for 1 hour.

Once doubled punch it down and divide in to 40 gram balls. Allow dough to rest, covered for 10 minutes.

Roll each dough ball in to a round shape. Using your thumbs, poke a well in the middle of the ball. Flatten and stretch this dent but do not go all the way though. Transfer to a lined baking tray. Cover and repeat with all balls.

Allow to rise in the fridge overnight covered in cling film.

Take out the bread 2 hour before baking. Pre heat oven to 220c

Once they have come to room temperature, Place onion filling in the dents you have made. Brush with egg wash and sprinkle some more seeds on top.

Once you place the bread in oven turn it down to 200c and bake for 20 minutes.

Remove from tray to a cooling rack once fully baked.