Pages

Saturday, 30 March 2013

Going Soft?/-/ Chocolate Fudge Finger buns


A few days ago I was drawn into a topic which struck a cord for me. I did not read it in the newspaper, but listened to it on a FM talk back radio show. How many people still listen to radio now? Not just as background noise to drown out uncomfortable silence at home. The only time I really listen to the radio is in the afternoon when I am driving home from University or navigating the hectic streets of Sydney to run a few errands. 


In Australia, FM is considered the young people’s radio frequency while AM, well I actually do not know what is on AM these days but it is classed as old people’s radio. Old or new does not matter to me as long as they play good tunes. I am good.

Back to the original topic. Recently an ex-government official made a comment about Australian parents and how they raise their children. In his article he stated that we are on the fast track to becoming “white trash” of the pacific region due to the Australian way of parenting. He recommends that we start parenting like Asian parents in Japan or China who push and dictate their child’s lives in order for them to excel in education. This article was in response to the lack of control younger generations and falling social standard in schools often portrayed by current affair type programs.


Now, being a member of the first generation Asian population ( first set of children in my family to be born in Australia), I was brought up in a household that was modelled on the traditional Asian way of raising children. I have been to numerous extracurricular activities, some of them I resented with a deep passion. I was pushed constantly to achieve a high standard, compared to other children who were better than me and was ALWAYS told the truth, even if it was negative.



You may think I absolutely hate my parents for being so had on me. Especially when I was surrounded by free caring friends and peers who could go out whenever and were always praised.
Well surprise, surprise you are wrong. Of course during my childhood I hated the way they parented and could not understand the logic behind keeping me lock up and miserable; sometimes I use to think they did it on purpose because they disliked me.

I honestly love my parents for raising me the way they did and would not have it any other way. It has made me the person who I am today, instilled ethics of working hard, respect and given me the skills to make educated choices. My parents gave up a lot to give my sister’s and I a better life for when we were older. Now that I am a legal adult, I believe they have achieved what they set out to do. At least I hope they think I turned out OK; I was quite the problem child.


At least during those years I was fed well. I think almost every country has a childhood bread treat. In America you have your Hostess ding dongs and R.I.P Twinkies, in Great Britain you have the Raisin custard bun and China; well the choice is endless. In Australia we have the finger bun. Traditionally, sweet white based bread dotted with sultanas and covered in a pink frosting with sprinkles for that special touch. I have been in a chocolate mood lately; maybe Easter does that to you; but I thought twist of chocolate and chocolate cover sultanas could liven up this classic. I forgot the icing but I think it works better with a thin drizzle of dark chocolate because the bun is very sweet and so are the fruits. Of course I could not forget the sprinkles! Never too many sprinkles here.

Give a bread a shot this Easter, it is not as scary as you think!


Double chocolate Finger buns

Adapted from Taste.com.au

Makes 24 mini buns.


7g (2 tsp) sachet dry yeast

100g (7/8 cup) caster sugar

140ml (5/8 cup) milk, warmed

450g (4 1/8 cup) plain flour

10g ( 1/8 cup) cocoa powder

1 teaspoon mixed spice

1 teaspoon ground cinnamon

50g ( 1/4 cup) butter, chilled, chopped

1 egg, lightly beaten

70g (1/2 cup ) chocolate covered sultanas, chopped

1 teaspoon vanilla extract

milk, for brushing

honey for glaze

hundreds and thousands (sprinkles to finish) 


Line 2 large baking trays with greaseproof paper. Place yeast, sugar and milk in a bowl. Stir until yeast is dissolved. Cover. Set aside in a warm place for 10 minutes or until foamy.

Sift flour, mixed spice, cocoa and cinnamon in a bowl. Rub in butter until mixture resembles fine breadcrumbs. Make a well in centre. Add yeast mixture, 65ml warm water, egg, chocolate sultanas and vanilla. Mix well to combine. Cover with lightly greased plastic wrap. Set aside in a warm place for 1 hour or until doubled in size.

Preheat oven to 200°C Turn dough onto a floured surface. Knead for 20 minutes or until smooth.

Divide dough into 24 portions. Shape each portion into an oval first. After roll the oval lengthwise to form a sausage. Place logs on prepared trays, 5cm apart. Cover with a tea towel and set aside in a warm place for 40 minutes.

Brush buns with a little milk. Bake for 12 to 15 minutes or until golden and cooked through (buns will sound hollow when tapped). Transfer to cooling rack. Brush with honey.

Once cool to touch. Melt chocolate over a pot of simmering water. Stir gently until fully melted. Allow to cool before piping onto the buns. After sprinkle your sprinkles on the top. Serve right away as they are best on the day made.


Thursday, 28 March 2013

Meal times! /-/ Coconut rice cake granola


I know this may come off as invasive but are you are a nibbler or three square meals type of person?

For as long as I could remember I have always been a nibbler or constant small meal eater. Of course there is a lot of controversy surrounding whether it is better to eat all the time or at three distinct times but for me snacking is the only way I am able to function. I think I inherit this from my parents and the way they used to feed my sister’s and me during our childhood. The kitchen was never off limits, but you had to eat the most important meal of the day. Nope not breakfast, it was dinner. The only time we had food rules and the dish I HATED MOST as a child had to be finished.


Can you guess what it is? Not the veggies or meat, but the carbohydrate very single Asian house hold has; white rice. That pile of steaming whiteness haunts my food nightmares. Still to this day I hold memories of being told to eat all your rice and me reluctantly eating it or sneaking it off my plate so I could get on with my night. To this day I cannot seem to find the exact reason why I hate white rice. Maybe it is the pure blandness of white rice and the texture which puts me off.

I am almost 15 years older since I tasted my first grain of white rice and honestly I still have problems with it. My relationship with this grain will never be a loving one but I kept an open mind and found a brown rice and wild rice quite pleasing. Sushi, brilliant.

I guess rice it is O.k* staple.
*“If I had to eat this because it is was the last thing on earth” O.k.

Nothing will come between me and my love for bread and noodles.


Granola, the fancy pants yuppie cereal is booming in Australia. People seem to love this mixture of crunchy sweeten grains, nuts, fruit and seeds covered in milk or topped on yogurt. Maybe because it has healthy connotations since it is whole grain AND Fruit! Shocker

Plus the packaging makes people feel it natural and good for you. What about a cardboard brown box with the words, nature or organic that gets people going?


Whether you love the marketing or hate it, the taste of granola is addictive. Though at prices for a standard good box of granola topping the high $7 mark, not something you can afford every day. That is until you see that granola is too easy to make at home and I bet you have everything you need in your pantry right now. Simply the mixture is your dry ingredients (nut, seeds, dried fruit, coconut and choice of dry flat grain), any type of fat or oil (nut or seed butters and oils), sugar(brown, white, raw, date etc. and your wet sticky binder( these can include a mixture of syrup and egg whites sometimes). Placing spices such as coffee, cocoa and nutmeg are just flavour enhances and can be altered as you see fit.


This granola is slightly different though. It is not made from oat meal or barely flakes. It is made from rice. Stale Puffed rice cakes to be exact. You would think the warning label on the packet is to protect you but like most things I rebelled and added heat. The result is a fantastic lighter and crispier version of crunchy granola. I was inspired to try this after reading the recipe for Matzo granola on the serious eats website. This may not be fit for pass over but it is conveniently gluten free, dairy free and vegan. Use any nuts, oil, sweetener seeds you want; this recipe can be altered as long as you have those key ingredients in it, you are set.

Whether a you are a nibbler or meals person, granola is a special treat for anytime of the day.


Coconut rice cake granola

Adapted and inspired by Serious eats.


170g brown rice cakes, crushed into pieces about 0.5cm to 1cm.

100g sesame seeds, white or black

150g shredded coconut

100g raw peanuts( I used the small red skinned peanuts, but if you use the bigger skinned ones chop them up a bit)

70g brown sugar

90g rice syrup

60ml rice bran oil

1tsp cinnamon

0.5 g salt, course flakes.


Pre heat oven to 150 degrees C. line two trays with parchments.

Combine rice cakes, peanuts, seeds, coconut and cinnamon in a large bowl.

Heat rice syrup , sugar, salt and oil in sauce pan. Turn heat to medium and cook till everything is combined and melted.

Spread on prepared sheets and bake for 20 minutes. When you are able to smell the faint scent to coconut and it should go golden.

Leave to cool on sheets and break up into desired shapes.

Store in an air tight jar for maximum freshness.

Monday, 25 March 2013

Bare necessities/-/ Bakery style meringue cookies


The typical icebreaker question, “what would you take on a desert island and why?”

I cannot remember how many times I have been asked this in order to fill an uncomfortable silence. While to some people this may be a trivial question, I actually think it is quite useful. Often it is changed by adding how many things you bring to this desert island but the premise is the same.


Consider the basics before even choosing your first luxury item. Food, water and shelter would be the main things but the lack of entertainment would send you mad in days. In addition, the point of tools is to help you escape the island rather than set up a new life? We all know how bad that can turn out to be *cue “LOST” starter*

I am not planning to travel to an isolated island anytime soon, however it triggers me to remember the little things in life we cannot live without.


Most people have one or a list of things they cannot live without. I am not talking about the basic tools for survival but the ones that make life actually worth living. On first though I immediately think, Internet. Yes, I am direct copy of the 21st century child, Gen Y, whatever you want to call it. I am not ashamed that I am addicted to the net and for those who say they can live without it; you are all lying. Your phone, news, radio, television and social networking; all controlled by the Internet. Even print media is going viral and with Internet shopping, established there is no limit to where the Internet can go.


As I continue to think, my one thing I really could not live without is my family and friends (O.k. this is technically two things but hey, this is my question) They are people who make your life. Life would not be as good if you did not have your friends to gossip with, consult with your father about problems, bond with your siblings or share that quiet moment in the morning with your mum before you carry on with your busy day. At times, they will irritate you or leave you disappointed but nobody is perfect. That is why you love them for their quirks, habits and mannerisms.


I recently have spoken about my need to master the basic recipes of kitchen. This is a landmark moment for me because I made a meringue cookie from scratch without it going brown! Before my meringues had an unattractive shade of pale brown, this did not meet my expectations of the bakery ones. A few key things to remember with meringues. Get yourself an electric oven, any kind of flame makes it harder to get the egg dry without browning. Next, set the oven low, low, low. Finally, use the Italian meringue, not the French style. I do not know why this is better maybe the cooked egg meringue is more colour stable?
EDIT: Also!!! If you have a large baking tray on hand. Place the tray on wire rack directly above your meringue tray. This acts as a cover against the element if you have an electric top and bottom oven.

If you grow up in Australia, these are just like ones you get in bakeries. Piped in a shape of an S with colourful sprinkles on the top make the perfect childhood treats. Sometimes they come in pink or blue too. Maybe this Easter if you are sick of all the chocolate bunnies and eggs, you can try some sweet meringues. Great base for ice cream sandwiches or crumbled on to some fresh fruit and cream.

Happy Easter Peeps! Share something sweet with your family and friends this holiday.


Bakery styled Meringue Cookies

Makes about 30 15cm by 5cm rectangle cookies.

From the Gourmet traveller.

200g caster sugar

30ml water

120g egg whites

Zest of one lemon


Pre heat oven to 125 degrees C.

In a saucepan, combine the water and caster sugar. Stir. Place in your candy thermometer.

Set over low heat and DO NOT STIR. Shaking the pan helps gets the sugar off the sides or a wet pastry brush. Continue to cook until it reaches 115 degrees C.

IN a stand mixer place your egg whites, and beat until soft peaks.

Once the syrup reaches 121 degrees, remove from heat.

Turn the mixer to high and pour syrup in a steady, thin stream until all syrup is used. Once you have incorporated the syrup, turn the medium high and beat until the meringue and bowl are cool. Add lemon zest in the last minute of beating

While this is happening, prepare two trays with baking paper.

In a piping bag with large star tip, spoon your meringue into it. Pipe your desired shape and bake for 90 minutes or until hollow when the base is tapped.

Friday, 22 March 2013

First times/-/ Triple choc hot cross bunnies


It is that time again! EASTER!!


Few days ago, the Royal Easter show opened its doors to a new generation, to experience the wonder and delight of visiting the show. I remember the times when I went to the Easter show, only during my childhood though. The wonder of the food (often sugar coated and deep fried), the fun rides and games which we know now are over priced and the best thing of all the show bags. The show bags are my favorite part of the show even to this day: I don’t know, there is something about cheap china made gifts and hundreds of candy and sample products that gets me excited.

Even though I love this part there is one thing about this experience I can not shake.


I hate to say this but nothing will ever beat the experience of going to the Easter show for the first time after that.  It just gets more disappointing. Every year I would either find something more disappointing or something I used to love would not live up the expectation.


Could it be the progression into tweeny years leaves you bored at the spectacle of farm animals?

The heighten sensitivity to smells, taste and noise? If you have ever been to the cow or horse stable at the Royal show, you will understand the case about the smell. The realizations that the gifts and novelties are overpriced bits of junk? Alternatively, heaven forbid your taste change and you realize you actually do not like candy or chocolate anymore.

Thankfully the last one did not happen to me.


I broke my love affair with the Easter show once I learnt the value of money (I know, it is so frugal to think of that first). Learning that money does not grow on trees popped my experiences from then on. While I do not blame the teachers at school tell me the honest truth of business, they could of waited a bit longer before they told me at age 8! Oh childhood ending right there.


I often speak of my child hood experience with food here. Something I Absolutely HATED when I was a child was hot cross buns. The combination of spices, fruit and that stick glaze which often made me frustrated (I was messy eater as a child). Of course we grow up and now the spices and fruit which I loathed I absolutely love now. My love for dried fruit sees me going through a 1kg bag of sultanas in a month by myself, cinnamon and mixed spice is on everything sweet and glaze; I think that speaks for its self.


The funny thing is I still can not stand the store brought hot cross buns, even though I love the ingredients now. This is serious dislike considering how much I love anything with yeast in it. This is the first time I have tried to make hot cross buns, but considering I still dislike the traditional forms; I decide to try the more mainstream version. Chocolate is good; it makes anything better, mops up tears and spark world peace. Fluffy cocoa base bread with the intense backdrop of spices and double chocolate chunks, heaven in a nut shell for me anyway. I used a basic milk brioche dough to form the basis of these buns, mixed in some bitter sweet chocolate and topped it off with a cross made from milk chocolate. The shape is just for a bit of fun and personality, besides this is the only time were the rabbit cutter is used more than another other time of year.

Brioche is fantastic rich bread which is base note of some of my favorite British puddings. So if you have The chance sneak a few away and leave them to go stale. Trust me, bread and butter pudding with chocolate brioche is so worth the calories (I actually do not care, but it seems people are being more concerned about this).


Triple chocolate hot cross bunnies.

Adapted from this Brioche recipe and inspired by the numerous hot cross bun flavours in the world

Makes about 12large bunnies


350g strong white bread flour plus extra for dusting

25g plain flour

25g cocoa powder, dutch processed

200g dark 85 % chocolate

1tsp cinnamon

1/2tsp all spice

1/4tsp nutmeg

To glaze 1 medium free-range egg

To decorate; 70g milk eating chocolate

5g dried yeast

10g fine salt

120ml warm milk

30g caster sugar

100g butter, softened

2 medium egg and 3 egg yolks , beaten

To knead by hand: mix all the ingredients in a large bowl, and bring it all together to form a dough. Knead for about 10 minutes, until smooth and shiny. 

This is an easy dough to work with I did not use much extra flour as i prefer to use oil to stop sticking
Shape the dough into a round, place in a bowl and cover tightly. Leave in the fridge overnight.
Next day, divide the dough in two and form into the rectangle. Lightly floured surface roll out the dough into a rectangle about 28cm long x20cm wide and 2cm deep. Flour your bunny cutter and punch into the dough. Place on a Lined baking tray. Repeat

Once finished cover and leave to proof 3 hours
Preheat the oven to 200°C. For the glaze, beat the egg and milk together.
Transfer the risen loaves to a baking tray and brush all over with the glaze.

Bake for about 10 minutes, then lower the oven setting to 180°C and bake for a
further 30 minutes or until golden brown. Cool on a wire rack.

Once cooled melt chocolate over a pan of simmering water stirring constantly

Once melted leave to cool for 5 minutes. Place in pipping bag of choice and pipe a strip up and across each of the buns faces.

Leave to set and then eat!


Wednesday, 20 March 2013

Relax, just do it.../-/ Garlic bread scones


Relaxing. After months of preparation for my sister’s wedding; my family is finally able to rewind. My parents have both been run of their feet these last few months. First organising family wedding traditions such as cutting of a WHOLE roast pig (yes head, legs and all), catering and cleaning for visiting guest( Wedding backdrops at the home do not get like by themselves you know)and managing to help my sister at a drop of a hat.


While my dad, the workaholic, is going back two days after the wedding( He has been work really hard in constructing his own man shed and organising the house furniture). My mum is finally taking the break she needs after a bumpy couple of months. They deserve it, following my sister’s orders to the mark.


My sister’s deserve a shout out too. Make up, hair, catering; My two sisters turned into wedding planners for these last few months. One day I wish I could organise something as wonderful as that for my next event.


While they are relaxing, I am returning to the hectic homework schedule of university. No time to rest now, straight in the content and on with the assessments. I already have four assessments due in the first few weeks of University, it seems like teachers are cramming it in before the Easter break...
Student problems....


I hate the fact I am developing an overwhelming sense of panic. Most of these are worth about half of my grade, but I think it makes you develop the skills to concentrate, keep a clear head under pressure and get straight to the point. Also for anyone who has gone through Tertiary education; the balance of social life, work , school and personal time is tight going.


This a short post, but I had the blog about these scones. I have small obsession with scones, I think it comes from my obsession with mastering basic kitchen recipes. You never know when you would need to pull out a dessert or cook a sauce to highlight an evening. Scones recipes differ from place to place; you have the USA types where the fat to flour ratio is higher or the British scone where animal fat or lard can be used and is marked by having higher moisture content. I have also seen new ones where soft drink is used. I prefer savoury scones or plain ones, but this can easy be made sweet. By adding some dried or fresh fruit, even chocolate or granola would make great extras.


Garlic bread scones

Makes 3 small dough balls, each cut up into mini scones about 8 each

Adapted from the ever great Joy the baker


385g flour, divided

40g sugar

10g baking powder

3g  baking soda

1/2 teaspoon salt

½ teaspoon garlic powder

160g unsalted butter, cold and cut into cubes

1 egg, beaten

30ml lemon juice

80ml cream, cold

80ml milk, cold

1 bunch of chopped parsely, mine filled ¼ of a metric cup

7 stalks of thyme, leaves removed.

100g fresh parmesan cheese

1 egg beaten for egg wash

Place rack in the center and upper third of the oven and preheat oven to 200 degrees C.

Line two baking sheets with grease proof paper and set aside.

In a mixing bowl, sift together 285g of flour, sugar, baking powder, baking soda, salt, and garlic powder. Cut in butter (using your fingers or a pastry cutter) until mixture resembles a coarse meal. In another bowl, combine egg, milk, lemon juice and cream. Beat lightly with a fork, leave for 5 minutes. Add to flour mixture all at once, stirring enough to make a soft and shaggy dough. Add the cheese and thyme and parsley.
 dump mixture on a clean counter to knead the dough together. I do not add all the flour in the beginning. I leave about 100g to allow for easy shaping and patting together.

Roll or pat out into 3 large balls. Using a floured knife cut the dough ball in half length ways and then half down. After cut each quarter into half. You should get eight scones.

Bake in pre heated oven for 20 minutes or until golden brown. Leave to cool for 5 minutes then move to cooling rack.

Sunday, 17 March 2013

The time of day/-/ Banoffee deep dish cheesecake


I am not a morning person, any chance I get I avoid getting up for as long as possible. Bright lights, noise and the rising sun all seem to annoy me. Now you know why I am the moon blush baker, I cook most often in the night and afternoon. I really do not know why I love the night whether it is the tranquil silence to wind down from the daily rush or the cooler temperatures, which allow me to relax; I need this nighttime me time.


Also it gives my brain time throughout the day to create my wonderful desserts. You never know what kind of inspiration you will encounter by walking in the farmer market or past the new pastry shop. Could some of the greatest food combinations come from this quiet time? Chocolate and peanut butter, maple syrup and bacon, Marshmallows and pumpkin or sweet potato(I actually do not get this combo, but Americans seem to like it).


Bananas and toffee are two of my favourite things to cook with. Toffee can have mellow bitterness to sweet buttery tones depending on what type of sugar used in the process and the many phases of banana life cycle. You can see that both of these ingredients can be used widely.


Banoffee is the wonder child of these two flavours and is classically shown in the Banoffee pie. A graham cracker crust filled with sweet chewy toffee and topped with caramelised bananas and cream. My Bother’s in law birthday has just past and as a gift to him ( his favourite flavour), I created a twist on this classic. Cheesecake is one of the top desserts around here, so many of my family members love it. I think the sourness of cream cheese to offset the sweetness makes it a great dessert.


I love the easy chilled cheesecake but nothing compares to the aroma of the baked cheesecake. High sided is the way to go as the smoothness of the cheese custard against a crisp base and side provides the perfect ratio.


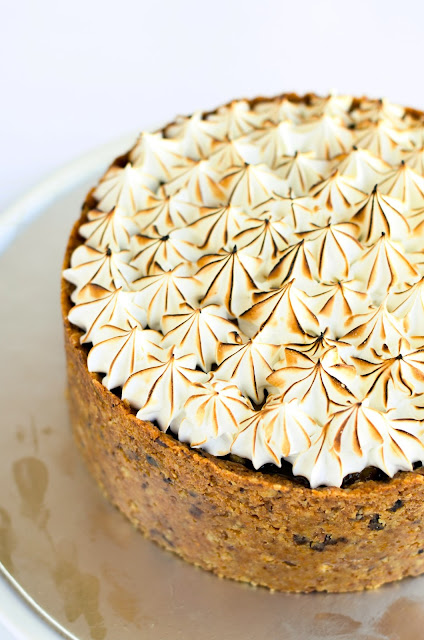
Pie and cheesecake join forces in this banoffee cheesecake! Banana cheesecake is the base to a layer of soft toffee and caramelised brown sugar bananas, topped off with toasted Italian meringue. Looks the pie doesn’t it?

Serve it with ice cream, eat it straight from the fridge; who cares! It will still taste fantastic.


Banoffee cheese cake.

Makes one 18cm cake.

Serves 10 but my family only eat small slices.

Adapted from Nigella Lawson Kitchen: Recipes from the heart and home.


Cheesecake base

300g dried fig and wheat bran crackers.

90g butter, melted


Cheesecake

500g cream cheese

3 egg yolks

1 egg

1 tbsp lemon zest

3 overripe bananas

100g raw caster sugar


Toffee topping

50g golden syrup

200g double cream

80g brown sugar

125 g butter


Caramelised bananas

One large banana

50g raw caster sugar


Italian meringue

20g water

150g white caster sugar

100g egg white


Pre heat oven to 160c. Line a 18Cm spring form tin, first wrap the base foil, then cling film then a double layer of foil. This should come up the sides of tin.

Process the crackers and butter in a food processor until it looks like damp soil.

Tip the crumbs in the tin. Using a glass push the topping on the base and along the sides. chill for 30 minutes.

Clean the food processor bowl.

Add cream cheese and blend till smooth. Add sugar and blend again until combined. With the motor running add one egg yolk and egg at a time. Lastly add the banana and lemon zest. You may need to scrap down the sides of the bowl in order to get a fully combined mixture.

IN large pan place your prepared tin. Fill with boiling water until half way up the tin.

Pour mixture into prepared tin. Cook for 40 minutes it should wobble in the middle but be set at the sides( I stop it when it is set at the sides by 3cm deep).

After 10 minutes remove from water bath but leave in the oven. This prevents the big crack from happening.

Once cold, move to the fridge and leave to set over night.

Prepare the topping, combine all syrup and sugar in a saucepan. Heat over low heat until it turns a darker brown. Remove from heat. Add cream in a stream whisking as you go. After add cubes of butter. Cool and cover in to the fridge until use.


On the day.

Cut the banana on an extreme angle. Place in skillet with sugar and a tsp of water.

On high heat melt the bananas and sugar together until it turns golden brown with a thick syrup.

Leave to cool,


Make meringue

Heat water and sugar in sauce pan until it reaches 118 degrees Celsius on a thermometer.

Whip egg white in stand mixer on high until soft peaks.

One syrup reaches 121C, remove from heat and sit for 30 a seconds.

In a thin stream pour the sugar into the running mixer on medium speed. After all the sugar is added, turn to high and beat until the bowl is at room temperature. It should thicken up a lot on beat and cooling.


For assembly

Remove cheese cake from tin.

Pour toffee on the cheese cake. Fridge for 30 minutes.

Place cooled bananas on the top. Fridge for 1 hour.

Pipe or mould your egg whites on the top. Blow touch on serving.


Wednesday, 13 March 2013

Lucky Trinkets/-/ Golden smoked spud nuts


Busy, busy, busy! 3 days until my sister’s wedding and I am doing the dessert table. So this means many cupcakes and many macarons. When someone ask me to make things I normally pretend to mind, but in reality I love any chance to get into the kitchen, even if it is not my favourite thing to make. Yes, Even though I can make macrons does not mean I enjoy eating them every day. My friends seem to find this trait weird but it is like person who works in the chocolate factory.


Everyone right now is on high alert and is in good spirits for her wedding. My extended family is in town that have not seen in 5 years which is great. The bad thing is that I am normally too shy and uncomfortable in large crowds. This means that awkwardness and uncomfortable silences are a sure thing; sometimes I wish I were not such an introvert. There was a point when I was not so shy, this was when I had a lucky coin, which I carried with me if I had to ever give a speech or be in a crowd. While many of you probably think I was being immature for thinking a coin could bestow good luck, but it boosted my confidence to acceptable levels.


First time, I used it for speech where I did not stumble and shake as I normally do. Second time, I found a large sum of money on the street. Third, I had it with me for an exam, which surprising I passed after skipping most classes for the year. The last one had lot to do with luck!

Unfortunately, I made the mistake of throwing out a pair of pants where I was carrying it. Damn.... lady luck dumped me.


Do you have a lucky trinket you carry? Please tell me I am not only one.

Normal wedding traditions have lucky symbols for a successful, happy marriage. You know the something blue, something odd, something new etc... In Chinese tradition the colours of gold and the continuous round lines are symbols of good luck and prosperity (well that what I learnt from the feng shui master). It is only
right I combine the two in bread.


Golden smoked spud nuts are baked donuts, which are made from an intensity-flavoured base of smoked potatoes, egg yolks and brown butter. I know donuts should be fried, but these donuts are still light due to the smoked potatoes. Like other vegetable flours (corn flour, potato flour etc.), they seem to make them baked goods softer; you have seen the numerous recipes which use this trick. This is well known for hundred of year but for some reason, we have only started using this now. Rich yolks and the nuttiness of brown butter boost the flavour and contribute to the golden hue of this bread without the need of colours.


It is such a strike of lucky that St Patrick’s day is coming round too! I normally Australia is not big on this holiday but with the attractiveness of booze; it is growing at a rapid rate. For me, Irish means potatoes, booze and lucky charms. While these donuts have a savoury edge, they would be wonderful served with honey and clotted cream or as lunchtime sandwich with smoked salmon and dill.

Whether you believe in luck or not, I would be happy to find a pot of these golden ringlets at the end of rainbow.


Golden Smoked Spud nuts

Makes 15 donuts and 15 holes


200g smoked potatoes, mashed

50g brown butter

70g raw sugar

350g Bread flour

150g milk, warm

5g salt

7g dry yeast

1 tbsp Brandy

3 yolks


Smoke potatoes
From Heston’s exploding potato donuts

Prick the potatoes (i used four medium ones) all over with a fork then coat them in groundnut oil and place them on a layer of salt spread on a baking tray. Place the tray in the preheated oven for 2 hours.

Remove the potatoes from the oven and cut them in half.
Place the smoking chips on the bottom of a saucepan and place over a high heat. Using a blow torch, light the chips until they begin to smoke.
Using aluminium foil, make a ‘pillow’ and place in the centre of the pan. Place the potatoes on top of the pillow and cover the pan with a lid. Allow to smoke for 5 minutes.
When smoked, scoop the flesh from the potatoes and reserve the skins. Put the potato flesh through a sieve and weigh out 200g. Reserve


Bread recipe
Adapted from these Sweet potato donuts

Combine sugar, milk and 2g yeast in jug and leave for 1 hour. This should be quick leaven for the bread.

In large bowl, add flour, smoke potatoes, brown butter, milk mix, salt, remaining year, brandy and yolks. Stir to combine. Turn out on to an oiled surface.

Knead the dough until it passes the windowpane test. I did 30 minutes of kneading with a break at 15 minutes for 10 minutes to rest the dough.

Mould into a ball and placed in an oiled bowl covered with cling. Leave to proof for 1-2hours.

Punch dough down once doubled and leave for 5 minutes.

Roll out dough in to a rectangle about 1.5 cm thick. Using a 8cm round cutter, cut circles from this dough. With a 2cm cutter cut the holes for the donuts from these 8cm rounds. You may get more or less depending if you re knead the dough and make new donuts from the scraps.

Transfer to a tray lined with baking paper. Leave to proof for 1 hour.

Pre heat oven to 180c.

Bake for 25 minutes. Once baked transfer to cooling rack.

Submitted to yeastspotting