Pages

Thursday, 29 August 2013

Restricted to... /-/ Tropical Kitchen sink Granola


I am still resting up from going under on Monday. Even though it has only been 3 days? Max, I am as bored as hell staying at home.


Yep, not even you Dr. Phil, The Doctor’s and Ready steady cook can keep me entertained. Sad, that I know the afternoon channel schedule off by heart? Totally that is only one station, I know the other free to air schedules too…

WHY do I store useless information!?

While I might not the party animal personality type, I do like to get out and about. Going to do supermarket shopping, green grocers and library on occasion. Maybe, just maybe the odd run or two to fill up the time. However under the strict supervision of a damn piece of paper and the watchful eye of my parents (not really but they do worry about me still being sleepy); I am stuck at home.


As a child I never use to go out but for some reason those days seem to past faster than they do now. Maybe I have been trained by high speed ADSL and Apple to expect instant gratification from every single minute of every day. I am sure I am not the only 20 something year old to feel like this, since thanks to instagram, everyone is having a better time than me with their constant party and delicious food.


It also doesn’t help that the foods I eat take AGES to chewy or swallow. I ate slow before, now I am at the turtle pace. I hope my microwave does not hate me after these few weeks for setting to 30 seconds every single time. Veggies have been nuked to kingdom come and forget out eating meat or any kind of protein (besides really runny eggs and tofu). Funny how you miss things once you cannot have them.


Now I understand what my sister is still going through being on restricted diet for her pregnancy. Life without cheese and bread is meaningless.

Of course I am doing university stuff but really who can sit and read about the problems with intimacy and love when you have a love hate relationship going right on it your mouth. Stitches to the right and left please dissolve quicker pretty please? I really want to eat an apple like a normal person; not like my chipmunk friends.

Either way this does allow me to make recipes that I only make in bulk. I am talking about the home made butter, crème fresh, ice cream (If you saw me on Instagram) and this recipe for granola.


Granola has to be saving grace around these parts because I think it helps my dad to stop eating Potato chips and mini chocs. Did I mention he sometimes eats into my baking supplies? Not happy Jan. Now we all evolved from thinking that granola is only for free spirit yuppies; So you can have granola without needing to pay the $6 price tag. I made these from whatever I had in the house, so you can say it is my kitchen sink granola?


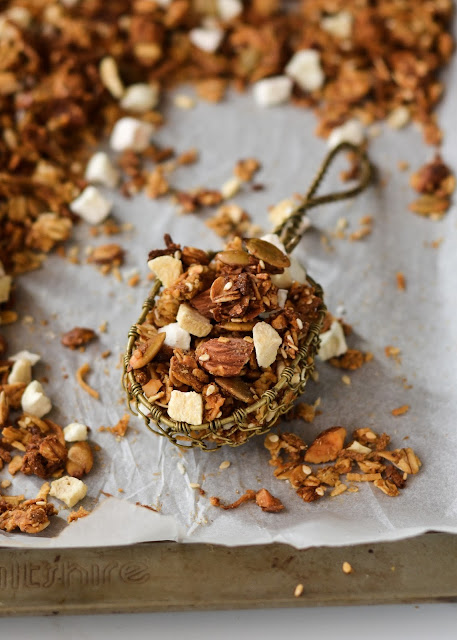
Never mind that you probably wonder why I post a recipe for granola after the massive influx a few months back. My only reason is that this is the result raid of pantry left overs and almost out of date ingredients. The combination of rice syrup, half a vanilla scrape, grated dark palm sugar and coconut oil (left overs) melt to form the glue which help bind the normal granola good stuff together. I know I am not vegan, but I think they deserve a bit of love. The inspiration for this granola came from having a lot of fibrous mango puree left after making ice cream, so in place of apple sauce I used that. Throw in coconut, freeze dried tropical fruit mixes, pumpkin seeds and sesame seeds; you got yourself a top notch brekkie. Tropical inspired granola to transport to a sandy beach even when your mornings are less than perfect.

I am not complaining.
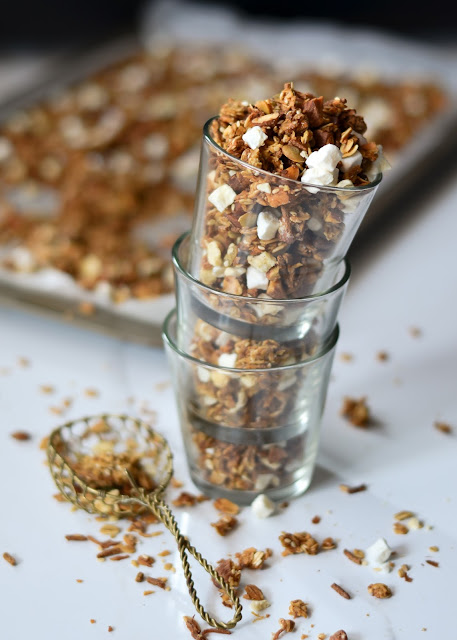


Kitchen sink granola (Tropical version)

Makes a little less than one kilo


300g Rolled oats

100g bran straw

50g wheat bran

50g white sesame seeds

80g pumpkin seeds

100g Chopped raw almonds

100g coconut, shredded

2g nutmeg ground

2g cinnamon ground

2g salt

400g mango thick puree


Melt mix

120g grated palm sugar, light or dark

60g Coconut oil

150g rice syrup

Half a vanilla pod


60g Freeze dried pineapple, apple and orange


Pre heat your oven to 150C. Line two trays with baking paper and set aside

Melt the Melt mix in a medium pan until combined. Set aside to cool

Combine all the dry ingredients in large bowl and mix to combine.

Add your puree and melt mixture. Stir to fully coat the dry mix. Leave to rest for minutes.

Place on your tray, pressing it as flat as you can.

Place in oven and bake for 30 minutes. Take it out and stir. Up the temperature to 180c

Now every 10 minutes stir until brown, about 30 minutes. Turn off oven and leave to cool. Stir in Fruit pieces.

Store in air tight jars.

Tuesday, 27 August 2013

Milestones/-/ Coconut English muffins


Guess what happen to me yesterday!

I went into surgery to remove my wisdom teeth. Now I know that may not be exciting to some but to me this was my first time ever going under general anaesthetic. In my whole life I have never been one of those kids who got hurt lot or took risk when playing out in garden. This means never gotten the chance to experience the arm sling, wheel chair or leg brace. Somehow this have left a part of normal childhood mile stones unfulfilled and I felt left out.


So yes after more than 24 hours of sleeping, I have come back to blog for you guys. Yes I love you, my followers, that much. If I could put a hugging GIF on my blog I would but I lack those tech blogging skills so maybe you can feel my gratitude though my actions. I might look like the fourth member of Alvin and chipmunks and have the mumbling voice of jabba the hut; but come hell or high water I can still blog! *sorry for the over reaction, I am just filled with energy right now*


Right now all I can say is I am glad the food blogging sphere had Popsicle week and ice cream week before I had this done. I am living off my dairy pops, ice cream, soda pop and the odd veggie/tofu soup. Not much you can eat while your face has four lots of stitches in it. On a positive note, I no longer have to be shy about my love to eat ice cream for breakfast, lunch and dinner anymore. Let’s say the 4 litre tubs are not going to last long in my house hold.


Even though I can have all these sweet foods there is one thing I am missing. One day in without bread, hell man I am missing it. I miss toast, sandwiches, cheese toasties and all the other things bread is a wonderful part of.

Could I be the first case of bread addiction? For you guys who have gone under surgery like me, what food did you miss the most?

Anyway for those of you who can eat bread, I am tell you to make your own English muffins. No they are not the same as those one you get in supermarket or the ones at McDonalds. They are so much better times 100.


I do not buy English muffins in Australia. There are two reasons behind this. 


One, most of them are miserably dry and have the pronounce flavour of raw flour.

Two, they have the scary ability to last longer than normal loaf of bread. I lost an English muffin pack in my car once and found it two weeks later in the same condition as I bought them. SCARY…..


So you can feel my excitement when Food52 does one with Christina Tosi. Of course I had to try them but I wanted to make them bit different. I love coconut in baked foods, so my adaption features coconut milk and coconut oil in place of butter milk and butter. I guess this also makes it vegan too but I was not aiming for that in first place.


Yes I did burn them a little bit (me and my absent mindedness) but they still tasted great! A little fig jam and butter is enough to sustain me most mornings. The hint of coconut in the muffin covers for that floury taste that can come with pan baked breads like this. They also come out very white and pale but do not be alarmed they are cooked. Wonderfully soft English muffins which everyone can share over a late breakfast or brunch; really what more can you ask from a meal?


Coconut English muffins

Adapted from food52

Makes about 25 ish muffins


7g yeast

56g water, warm

170g coconut milk, warm

500g bread flour

30g sugar

5g salt

70g coconut oil, at room temp or slightly above.

Spray oil

Cornmeal

Serving; Fig jam, butter, vegan sub etc..


Combined yeast, coconut milk and water in a large bowl and allow to bubble up. This should take 10 minutes.

Add flour, salt and sugar in the bowl. With your hands mix the dough until it no longer sticks to the sides but it will be very wet. It is ok! Just work with it. The best dough always is on the wet side.

Turn your dough out onto well floured surface. Now slowly knead in your coconut oil until it completely combined. Continue to knead until becomes a sloppy but no longer sticky dough ball. You may think it is too wet but you need it for English muffins. This took me about 15 minutes.

Spray an another clean bowl with oil and place your dough in it, cover and prove for 1 hour in fridge.

Cover two baking trays with corn meal, be generous here.

Take your dough from the fridge. Cover your work surface with flour then tip this dough onto it. Knead a few time to bring it together then work it into a log shape.

Divide your dough into 50 gram balls. Lightly roll into a round-ish shape and push lightly into the corn meal dust on the trays. Dust both sides with corn meal.

Leave to prove for 30 minutes. Turn on your oven to 150C.

Heat your skillet to medium low and toast a small handful of corn meal in the pan.

Transfer a proved muffin to the skillet, dust off as much corn meal as your can. Cook on the skillet for 5 minutes then turn. Continue to cook for a further 4 minutes on the other side. They should have a nice brown on both sides.

Transfer them to the baking sheet and place them in your oven for 10 minutes to dry out and bake more. Remove from oven and allow to cool on trays before serving.

Thursday, 22 August 2013

The "S" word /-/Granola cookie crumbled pancakes with runny date blueberry syrup


I read somewhere that you sound never say sorry to your blog readers for not posting as often as you should. I really think I should explain myself for my lack of consist postings.

Truth is I might be in my twenties but I have the stamina of a slug. Feeling lots of S words lately too. Sluggish, sleepy, stressed etc... 


Maybe because I am about to shoot the weather for changing on me so rapidly. One day a lovely warm spring day, next I am about to freeze my limbs off from the cold cold breeze. This does not help me to sleep, which as you guys know is almost nocturnal.


In addition, over the past two weeks I think I have done more custom cake orders than I have done for the first half of the year. Not to mention I am about embark on my first dessert table!


Yep my sister is currently with child (very heavily with child, she is only tiny, 5 foot 2). So at her request have done cookies and cakes for her shower. If you follow me on instagram you can see the cookie we done last night. Big honey sugar cookies in the shape of elephants.

For some reason she has want elephants as the theme to her shower but each to their own I guess.


Lots of tears have come about with this project, but I am sure I might learn something from it (finger crossed). Yes I have cried over fondant and cake… Judge as you will.

Of course I am no sprinkle bakes ( love her) but they did not turn out too badly if I say so myself (overall). The best part me is the cookie base, that I developed, was well received by everyone who tasted it! Happy days when people like the taste of my cooking


Excuses, excuses, excuses I hear you say. For those who might sympathise with me thank you and continue reading because I have food hack that should be done by anyone who needs sugar comfort.

I present to you Granola cookie crumbled pancakes with runny date blueberry syrup. Try getting your head around that one in the morning!

Cookies, syrup and pancakes. Check list for a great start to any day.


I love breakfast food for any time of the day and this recipe can be adapted to be as sweet or trashy as you like. The virtue of this recipe is that a majority of ingredient used  come from sources of natural sugar and whole grains, so it is not as dessert like the title makes it out to be. I have recent found a brand of oatmeal cookies in Australia that uses processed oatmeal as the base. This means the texture is not rough but chewy and soft set like the one made with normal flour. Of course you can use any cookie you fancy at the moment, but right now these Granola chew cookies are my choice.


I do not have copy- cat recipe of the cookie to give you (working on it!) but I think you could get away with using your favourite cookie in this recipe or if you want to go the whole meal route; I recommend trying an Australian classic the ANZAC in this pancake stack. When under baked ANZACS are notoriously chewy with a crispy edge, so great sub here.

Date syrup is something you can home make and is 100 times better than store bought. For a twist I also soaked a few blueberries in the mix. Wonderful tart flavour comes from the blueberries which I like. Feel free to leave this out but!


So I am sorry or having almost nothing to talk about in this post but I think this pancake hack will leave you very happy.


Granola cookie crumbled pancakes with runny date blueberry syrup

Serves 2


100g Crumble up granola cookies, ANZACS or your favourite whole grain biscuit.


Pan cake

150g whole wheat flour

30g palm sugar grated

30g brown rice flour

2g salt

15grams of baking powder

5g bicarb soda

250g buttermilk plus extra for thinning

1 egg yolk

1 egg

One scraped vanilla pod.

30g melted cooled butter


In large jug whisk your milk, sugar, vanilla until well combined. In smaller bowl whip up your egg and yolk until it slightly fluffy and turns a pale yellow ( it will not be like egg white but it is need for the air)

In a bowl combined your flour, baking powder, salt and bi carb.

Make a well in the middle of the flour bowl and pour your milk mix in.

Working from the inside out, bring in the flour with with a whisk until combined. After pour in butter and mix. Fold in your eggs until combined.

Place to rest on the counter for one hour.

After one hour pre heat a non stick skillet to medium low.

Using a ¼ measure scoop batter on to pre heated pan . Allow to cook for 3 minutes or when the top is covered in small bubbles. Flip and continue to cook until it significantly browned on the other side about 2 mintues. Remove and cover with a towel to keep warm


Date blue berry syrup

Adapted from Wing it Vegan

180g pitted dates

50g dried blue berries

400ml water


In large pot place your dried fruit and water. Bring to boil then turn it to summer for 30 minutes. Allow to cool.

Once cooled process it until it is a smooth as possible. Strain it though a fine sieve but do not press!

Use as desired


Assembly

Place one pancake down then crumble one tablespoon of cookie crumb on to that pancake. Continue this until you get a stack. Top with a final whole cookie and drizzle over syrup.

Monday, 19 August 2013

Blogging over time /-/ Mini challah on the grill


I am popped. Really like down dog dead….


I haven’t even been bothered to set up photo shots for the two custom cakes I made this weekend. Did I mention before I do that as a side job? Well if didn’t then now you know. I might post the simple shots of the cakes I made for my bother in law (by request of my sister) and the girly party cake via instagram or twitter. Either way I need a bit of R&R before my first catering party job (Yes, it is only for sister’s baby shower but none the less it is a party: and I making lots of things)


Oh ye when I am tired I am melodramatic. Anyway I have a burning question for all you blog owners out there.


One thing that gets me is that does everyone on the food blogger network feel they are put down about how much effort they put into a post?


Some may say:

“What is so hard to set up a simple photo box and snap a couple of pictures right?”

“Write 400 words of musing before posting recipe right?”


Well I think as a blogger I have the perfectionism bug. I do not do things by halves, so it is either all of nothing. This blog is my all plus 10%. I am not the best photographer nor am I a great writer, so I really put a lot of effort to bring you each post. Yes I love all you that read this. I am grateful for all those who comment and deal with my ramble. Also I do not take pictures of everything I make each week; only stuff that is worth it. I am sure I am not alone. If I was to stop and take picture of everything I think I would have aback of photo post of at least 10.


Yep I bake a lot. Sue me.

I remembering reading a few weeks ago about an article that described the face work of food bloggers and the number of hours placed into it (sociology research of the best kind). They found that a blog was not just a means of income and recreation. For some it was form of identity work. The theme or layout was their make-up, the photos and recipes described their personality and indirectly shaped their philosophical beliefs.

Now isn’t that a wakeup call that they spend 10+ hours doing “blog work”?


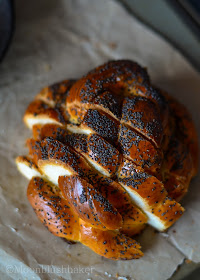
Sometimes the best recipes are one that come by accident. While browsing the Internet I discovered Food52’s recipe for challah. What makes this one different is that you cook it in the BBQ on stones and it is baked in a skillet! Yep, I just had to try this. Jewish bread and grilling both won my baking heart. I have wanted to make a loaf of this for ages (because once it is stale make THE BEST French toast) and my family has been craving plain bread. It is nice to blame someone else for a change?

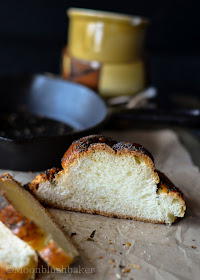
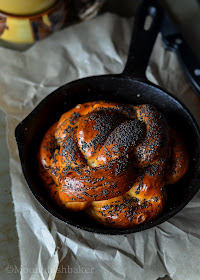
I am not best braider, so for all the Jewish folks out there; I am really sorry! I still love this bread. The tight crumb delivers an eggy richness in every bite; Really what can be better to restore stability to my popped out soul? I chose to do a round one but the long braid is acceptable too. I made half of this recipe and divided among the two 15cm skillets I have. Golden brown crust and a soft rich insides; bread does not get better than this.


Challah on the Grill

From food52


For the challah dough

10g active dry yeast
120ml warm water
30g honey
6g salt
2 egg yolks lightly beaten

1 egg lightly beaten
60ml olive oil
450g bread flour flour


For the egg wash and topping

1 egg yolk stirred with a bit of water

2 to 3 tablespoons poppy seeds


Sprinkle the yeast over the warm water in a large bowl and allow it to dissolve. Mix in the honey, salt, eggs, and olive oil.

Tip you flour in to you bowl and knead until it forms a rough ball

Knead the dough, I added about 50g of extra flour during this process. When the dough is smooth and elastic, place it in an oiled bowl, cover it with a towel, and set it aside to rise in a warm place

Dust a heavy cast iron pan with cornmeal, place the dough in the pan, and allow it to rise again until doubled (about 25 minutes). Preheat the barbecue on high with two side-by-side fire bricks on the grill.

After the final rise, brush the top of the loaf generously with egg wash and sprinkle it with poppy seeds.

Place your pan son top of the preheated fire bricks in the barbecue, and close the lid. Set the heat to “medium” and bake for 15-20 minutes (tested it with temperature method).

Remove the pan from the barbecue and let cool completely before slicing.

Wednesday, 14 August 2013

Naive pleasures /-/ Shattered salted caramel slice


As an adult, I am still trying to find things that make my child hood special that did not revolve around food. BUT I think I have found it! One thing I think we all can relate to child hood naivety, yes I am grateful for being naive as child. Now most of you would think why in hell would you be grateful for that out all things!? What about…etc. etc.


Sorry but this is what I think makes child hood so special. I want you to think about it what if you weren’t naive as a child or gullible? Would your child hood really be as “magical” as you remember it now?


Doing sociology at University really sometimes opens your eyes to things in popular culture. No seriously for any of you guys who have even done an arts or philosophy course; you will understand that it requires you to change your way of think about everyday life. I have done this for three years and now I find it too hard to turn off. While it does serve an useful tool in analysing people in the coffee shop (yes, I am looking at you apple computer yuppie with your organic hemp sack and designer jeans); it sucks the innocence out of some things.


For example, we all know how Twilight and True blood have become the newest hottest movie/ television shows. While it may have the cover of being an seductive vampire love story filled with action and sexy, sexy bodies (Have you seen true blood? It is like soft porn…) If you look a little deeper, ok may lot deeper you can see that twilight is actually teaching the lessons of the Mormon church and True blood is talking about racism, Aids and the politics of sexual difference.


Now at this point you probably think of me as baker with a few screws loose. I challenge you to go watch an episode or read a chapter of these two text and try to tell me that I am wrong. I give you hint for twilight; the outfits that the elders are wearing the judgement church scene; anything look familiar to the ancient Mormon set up for inquiry and sentencing? The pain and horror Bella when through child birth? See the guild lines for a traditional Mormon birth.


Now you don’t need to learn to love a good old fashion Australian caramel slice. While I do love the classic, I am not fussed about the short bread base since I find it too crumbly and I have to turn the oven on. Yes Sometimes I am that impatient. So this is my take on the caramel slice made on the stove and a few hours of fridge time. Also the stove time means I can indulge my love of stove top stirring.


I am complete addict to caramel or toffee with salt. So the twist on this caramel slice is the Crunchy salt Toffee topping which sets like glass on a bed of stiff chocolate ganache. When you come to cut this slice, the pieces of toffee break into the soften ganache making for the best bitter sweet contrast to the comforting sweeten milk caramel and caramel chip cookie base. This slice is not the faint hearted sweet lover, so approach at your own risk. For all those who dare to wear the sweet, salty badge with glory even though other may call it a fad, join me in slice of this shattered salted caramel slice. Well worth the sugar rush after it.


Shattered Salted caramel Slice

Makes a loaf pan about 10cm by 25cm.


Base

50g melted butter

50g caramel baking chips

200g butter nut cookies or any sweet plain biscuit


Caramel filling

375g condensed milk

50g butter

40ml golden syrup

2g pink flake sea salt


Stiff dark chocolate ganache

150g 70% dark eating chocolate

25g butter

30ml cream


Burnt toffee topping’

150g caster sugar

30ml water

Generous sprinkle of flake sea salt


In small saucepan, melt butter. Allow to cool.

Pulse caramel chips, butter nut biscuits and melted butter in food processor until it comes to fine, damp crumb.

Line your dish with baking paper and pour this mix in. With your hands push down firmly into the bottom of your tin. Fridge until needed.

In a medium sauce pan combine caramel layer ingredients and Stir over medium heat until it thickens and turns a dark shade of tan. This should take around 10-15 minutes.

Pour immediately on to the base in your prepared pan. Transfer to fridge to set about 1 hour.

Make your ganache by heating cream butter and chocolate in thick base sauce pan until melted. Stir constantly but gently.

Take your pan out of fridge and pour this on top. Fridge until ganache is set. About 4 hours or overnight is best.

Remove slice from pan. Place on baking tray covered in a baking paper

On serving make your toffee coat by heating sugar and water in saucepan over medium heat until it turns a dark shade of brown. Make sure you take it as far as it can go as this is what helps off set the sweetness of the chocolate and caramel layers.

Once done pour on to the slice, allow it to drip all over the sides.

Sprinkle with flakes and allow to set in the fridge for 30 mintues.

Cut with heated hot knife.

Monday, 12 August 2013

Sister Dearest/-/ Tierd Macaron, honey and strawberry cake


My sister’s birthday was this past weekend and of course I made the cake. I would never describe my relationship with my sisters has close. I am not being my negative self but it is reality. The age gap between me and sisters is about 10 years. As you can see 10 years difference does mean I have lot of catching up to do.


My two older sisters have always been close while I drifted off into the background. Left often to entertain myself with make believe stories I acted out with winnie the pooh figurines and play sets. Sad yes, but this story does not end on a low note. This is why I love my sister more than anything is her ability to make the best out of nothing and the effort she puts into little things


While I admit it does make forming a close relationship difficult but she has always made me feel involved even though she does not have to.


I remember she always used to take me out during summer school holidays when I was in primary school. If you are unfamiliar with the Australian school system, the summer holidays are longest and often the most boring one for me as a small child. I never had anyone to play with. No younger or close to sibling to pick fights with, no pets as my father despised them (fortunately that has now changed) and my parents both work full time, so family day was something of fantasy.


Even though she was only a teenager at the time, she would make what ever we had. Whether it is playing along with my make believe games or a simple movie rental she always made it fun. 

Now she has her own family and me being able to adventure, we sometimes do not talk as much as we used to but like my childhood we still make the best it. 

So thank you, for bringing a bit of hope to my days.


Now I am photo bombing you guys but with good reason! If you saw my post on instatgram, I made tons of macarons. This is where they all went! She loves these little cookies more than anything else. She would of have requested a macaron tower but I already made one for her the year before. Inspired by the ever wonderful Donna hay I used the tied layer cake in her 10th birthday magazine as my inspiration for this cake.


I don't think I need to explain how delicious this cake was. Strawberry and honey is an unlikely flavour but it does work! Creamy and dreamy buttercream using French and swiss method provide contrast to this cake. One devilishly rich, the other subtle but smooth as silk layered between a strawberry infused sponge. Of course the star is the macarons; I really do not have to do anything to them to make them any better. This is a long recipe but it is well worth to make something like this once in a while. Go on spoil someone you love with this cake. They will love you for it!


Honey and vanilla macaron layer cake with strawberry sponge.

Inspired by Donna Hay and Cake recipe from this post


3 batches of Plain colour macaron shells (recipe follows)

1 recipe of honey swiss butter cream

2 recipe of vanilla swiss butter cream

1 recipe of vanilla French butter cream

3 batches of strawberry sponge cake

2 Cake tins in 22cm, 18cm and 12cm (lined and greased)


Macaron shells

Macaron recipe from Tartelette


90g egg whites

110grams almond meal

200g icing sugar

25g caster sugar

Food colouring of any colour; I used yellow, purple and pink gels here.


In a stand mixer fitted with the whisk attachment, whip the egg whites to a foam, (think bubble bath foam) gradually add the sugar and milk powder until you obtain a glossy meringue (think shaving cream

Place the powdered sugar and almonds in a food processor and give them a good pulse until the nuts are finely ground. Add them to the meringue, give it a quick fold to break some of the air and then fold the mass carefully until you obtain a batter that falls back on itself after counting to 10. Give quick strokes at first to break the mass and slow down. The whole process should not take more than 50 strokes. Test a small amount on a plate: if the tops flattens on its own you are good to go. If there is a small beak, give the batter a couple of turns.

Fill a pastry bag fitted with a plain tip (Ateco #807 or #809) with the batter and pipe small rounds (1.5 inches in diameter) onto parchment paper or silicone mats lined baking sheets.

Let the macarons sit out for 30 minutes to an hour to harden their shells a bit. In the meantime, preheat the oven to 280F/150C. When ready, bake for 15 to 20 minutes, depending on their size. Let cool. If you have trouble removing the shells, pour a couple of drops of water under the parchment paper while the sheet is still a bit warm and the macarons will lift up more easily do to the moisture.

Don't let them sit there in it too long or they will become soggy. Once baked and if you are not using them right away, store them in an airtight container out of the fridge for a couple of days or in the freezer.


Vanilla swiss butter cream

From brave tart’s swiss butter cream recipe

140g egg whites

140g caster sugar

3g sea salt flakes

1 teaspoon of clear vanilla extract

210g unsalted, cubed, softish butter.


In medium bowl whisk together your egg whites and caster sugar.

Place bowl over a saucepan of simmer water. Whisk continuously until the sugar is fully dissolved. Rub a bit of mix between your fingers to test.

Transfer mix to a stand mixer with the whisk attachment. Beat until it becomes a big fluffy and white. At this point it should take about 8 minutes for the meringue to come to room temperature.

Change to paddle mix. While beating the mix on medium with the paddle add the butter a cube at a time until it fully combined. GO slowly here and scrape down the bowl frequently. Once butter is all added, beat on medium high till it is fluffy and pale.

Add vanilla and beat again.

Set aside for later use


Honey swiss butter cream

140g egg whites

140g caster sugar

3g sea salt flakes

1 teaspoon of clear vanilla extract

210g unsalted, cubed, soft butter.

200g runny honey.


Follow same instructions as the Vanilla swiss butter cream. In order to incorporate honey use the final vanilla. While beating on low, pour in the honey into the vanilla swiss butter cream until combined.

Set aside for later use


Vanilla French butter cream

6 yolks

250g caster sugar

30ml water

450g butter

2 tsp clear vanilla extract.


In a stand mixer beat egg yolks until pale yellow and fluffy. This takes about 7 minutes.

At the same time, in a sauce pan combined sugar and water. Place on stove on medium heat. You are making sugar syrup.

Heat the syrup, swirling to evenly distribute heat. Bring the mix to 118C.

Once it reaches this temperature, drizzle the syrup into the beating bowl of egg yolks. Make sure to pour down the side to avoid the beaters.

Continue to beat until this mix is room temperature. It will not be as big as the normal egg white mixes but it should be pale and creamy.

Change to paddle.

Add the butter slowly on medium speed. Scrape the bowl often. Continue this process until all butter is added.

Add vanilla and beat on high medium until fluffy.

Set aside.


Strawberry sponge


6 eggs

150g caster sugar

180g plain flour

20g butter melted

40g Strawberry milk powder


Optional; pink food colour


Preheat oven to 185c. Grease and line your spring form tins with baking paper.

Prepare a saucepan with simmering water.

Break eggs into your mixing bowl of a stand mixer and beat until it has triple in volume,

While whisking add the sugar, milk powder and food gel slowly once it is at the foam stage. Keep whisking to it is thick and glossy but it will very wet like (not like normal meringue).

Remove bowl from electric mixer and place over the simmering water.

With a large whisk, beat the mixture until it reaches a temperature of 40C. Use a thermometer for this part as you need to stabilise the egg yolks before adding flour.

Return to stand mixer and whisk until it forms soft peaks.

Remove bowl from mixer and shiver in your flour.

Fold the flour into the egg mix. DO not over work!

Add melted butter and fold in just till it is incorporated

Bake at 180C for 20-25 until the top is golden brown, and the skewer is inserted and comes out cleanly.


Assembly

For each cake layer you will need to trim and crumb ice each one using vanilla swiss butter cream. Fridge for 1 hour.

Do a final coating for each layer in French butter cream.

Layer cakes from largest to smallest.

Place a small amount of butter cream on the backs of each macaron and push in around each cake layer.